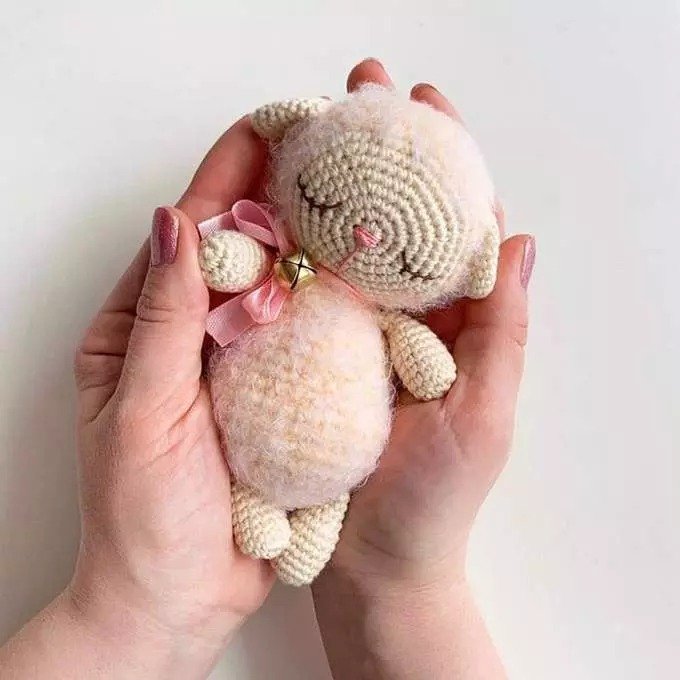
Free Crochet Masterclass for Sleeping Sheep by Harigurumi
In this tutorial, you’ll learn how to crochet a cute sleeping sheep using amigurumi techniques. You can use any type of yarn, such as acrylic, cotton, or half-cotton yarn. For the body and head, it’s recommended to use yarn with long fibers, such as Nako Paris. At the end, you can finish the toy with felt or fabric for the eyes.
Materials and Tools
- Long-fiber yarn in rose color (for the body and head)
- Smooth yarn in beige color (for the face)
- Crochet hook (appropriate size for your yarn)
- Stuffing for the toy
- Embroidery thread or floss (for the face details)
- Ribbon for decoration
- Small bell (optional, for sound)
- Needle for attaching details
- Scissors
Abbreviations:
- KA – Magic ring (amigurumi)
- sc – Single crochet (US)
- sl st – Slip stitch
- inc – Increase
- dec – Decrease
- (…) x n – Repeat n times
Step-by-Step Instructions for Crocheting the Sleeping Sheep
1. Head
- Row 1: 7 sc in KA (7)
- Row 2: 2 sc in each stitch around (14)
- Row 3: (1 sc, inc) x 7 (21)
- Row 4: (2 sc, inc) x 7 (28)
- Row 5: (3 sc, inc) x 7 (35)
- Row 6: (4 sc, inc) x 7 (42)
- Row 7: (5 sc, inc) x 7 (49)
- Rows 8-10: 49 sc (3 rows)
- Row 11: (5 sc, dec) x 7 (42)
- Row 12: (4 sc, dec) x 7 (35)
- Row 13: (3 sc, dec) x 7 (28)
- Row 14: (2 sc, dec) x 7 (21)
- Row 15: (1 sc, dec) x 7 (14)
2. Body
- Row 1: 7 sc in KA (7)
- Row 2: 2 sc in each stitch around (14)
- Row 3: (1 sc, inc) x 7 (21)
- Row 4: (2 sc, inc) x 7 (28)
- Row 5: (3 sc, inc) x 7 (35)
- Rows 6-9: 35 sc (4 rows)
- Row 10: (3 sc, dec) x 7 (28)
- Rows 11-13: 28 sc (3 rows)
- Row 14: (2 sc, dec) x 7 (21)
- Rows 15-17: 21 sc (3 rows)
- Row 18: (1 sc, dec) x 7 (14)
- Row 19: 14 sc
3. Legs (4 pieces)
- Row 1: 7 sc in KA (7)
- Row 2: 2 sc in each stitch around (14)
- Rows 3-8: 14 sc (6 rows)
- Row 9: (1 sc, dec) x 7 (9)
- Rows 10-12: 9 sc (3 rows)
4. Ears (2 pieces)
- Row 1: 7 sc in KA (7)
- Row 2: 2 sc in each stitch around (14)
- Rows 3-9: 14 sc (7 rows)
5. Muzzle
- Row 1: 7 sc in KA (7)
- Row 2: 2 sc in each stitch around (14)
- Row 3: (1 sc, inc) x 7 (21)
- Row 4: (2 sc, inc) x 7 (28)
- Row 5: (3 sc, inc) x 7 (35)
- Row 6: (4 sc, inc) x 7 (42)
- Row 7: (5 sc, inc) x 7 (49)
Assembly
- Stuff the head, body, and legs lightly with filling.
- Attach the head to the body securely.
- Sew the legs onto the body.
- Sew the ears to the top of the head, positioning them symmetrically.
- Attach the muzzle to the face.
- Embroider the facial features using embroidery thread: add a small nose and closed eyes to make the sheep appear to be sleeping.
- Optionally, you can add a ribbon around the neck and sew a small bell to the ribbon.
- Weave in all loose ends and cut any excess yarn.
Final Touches
You now have your cute, sleeping sheep! If you prefer a more fluffy appearance, you can carefully trim the yarn in certain places, or you can add additional yarn for more texture. Enjoy your handmade creation!