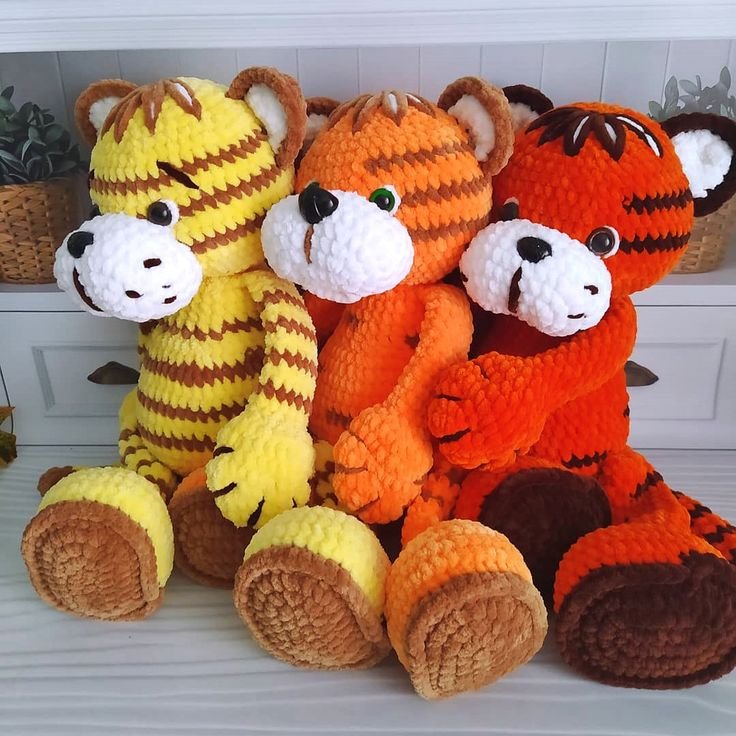
Amigurumi Tiger Timka in Plush Yarn
A free crochet pattern for a large plush tiger by @vilena_toys, made with plush yarn. The finished tiger will be about 40 cm tall. The author used a 4.0 mm hook and Himalaya Dolphin Baby yarn. The body and head of the tiger are crocheted in one piece, with the legs incorporated during the process, and the other parts are sewn on.
Author: @vilena_toys
Materials and Tools Needed:
- Yarn: Himalaya Dolphin Baby (100% polyester, 120 m / 100 g)
- Main color #80316 – 2 skeins
- Accent color #80765 – 0.5 skein
- You can substitute the main color with YarnArt Dolce #778
- Hook: 4.0 mm
- Plastic eyes, 14 mm half beads
- Plastic nose, size 18×20 mm
- Needle, scissors, transparent glue
- Stuffing: Hollowfiber
- Abbreviations:
- KA: Magic ring
- ch: Chain stitch
- sl st: Slip stitch
- sc: Single crochet
- inc: Increase
- dec: Decrease
Paws (Make 2)
Start with the accent color.
- Ch 7, from the second chain, 5 sc, 4 sc in one stitch, then on the other side of the chain: 5 sc, 4 sc in one stitch (18)
- 5 sc, 4 inc, 5 sc, 4 inc (26)
- 5 sc, (sc, inc)4, 5 sc, (sc, inc)4 (34)
- 5 sc, (2 sc, inc)4, 5 sc, (2 sc, inc)4 (42)
- Switch to the main color, crochet through the back loops: 42 sc (42)
6-8. 42 sc (3 rows) - 5 sc, (2 sc, dec)4, 5 sc, (2 sc, dec)4 (34)
- 5 sc, (sc, dec)4, 5 sc, (sc, dec)4 (26)
- 5 sc, 4 dec, 5 sc, 4 dec (18)
- (sc, dec)*6 (12)
Close the hole, weave in the end.
Attach the accent color yarn to the 4th round and crochet through the front loops: 42 sc, sl st. Weave in the yarn.
Legs (Make 2)
- Ch 19, from the second chain, 18 sc, join into a ring (18)
2-14. 18 sc (13 rows)
Cut the yarn, leaving a tail for sewing. Attach this side to the foot. Do not stuff. The other side, where the piece started, will be crocheted into the body.
Upper Paws (Make 2)
- 6 sc into KA (6)
- 6 inc (12)
- (sc, inc)*6 (18)
- (2 sc, inc)*6 (24)
5-7. 24 sc (3 rows) - (2 sc, dec)*6 (18)
- 6 dec, 6 sc (12)
10-24. 12 sc (15 rows)
Stuff only the lower part.
Fold the piece in half and crochet 5 sc through both edges. Cut the yarn, leaving a tail for sewing. Attach the paws to the body.
Body and Head
- 6 sc into KA (6)
- 6 inc (12)
- 12 inc (24)
- (3 sc, inc)*6 (30)
- (4 sc, inc)*6 (36)
- (5 sc, inc)*6 (42)
- (6 sc, inc)*6 (48)
- Crochet the legs: 8 sc with leg, 16 sc, 8 sc with leg, 16 sc (48)
9-15. 48 sc (7 rows) - (6 sc, dec)*6 (42)
- (5 sc, dec)*6 (36)
- 8 sc, 6 dec, 16 sc (30)
19-22. 30 sc (4 rows) - (3 sc, dec)*6 (24)
- 12 dec (12)
- 12 inc (24)
- (sc, inc)*12 (36)
- (5 sc, inc)*6 (42)
- (6 sc, inc)*6 (48)
- (7 sc, inc)*6 (54)
- (8 sc, inc)*6 (60)
31-34. 60 sc (4 rows) - (8 sc, dec)*6 (54)
- (7 sc, dec)*6 (48)
37-38. 48 sc (2 rows) - (6 sc, dec)*6 (42)
- 42 sc (42)
- (5 sc, dec)*6 (36)
- (4 sc, dec)*6 (30)
- (3 sc, dec)*6 (24)
- (2 sc, dec)*6 (18)
- (sc, dec)*6 (12)
- 6 dec (6)
Cut the yarn, pull the hole closed, and weave in the yarn.
Ears (Make 4)
Crochet 2 pieces in white and 2 in accent color, working back-and-forth, beginning each row with a ch.
- Ch 2, in the second chain 3 sc (3)
- Inc, sc, inc (5)
- Inc, 3 sc, inc (7)
4-5. 7 sc (2 rows)
Cut and secure the yarn for the white pieces.
Join the two pieces together and crochet around the perimeter with sc. Turn and crochet around again. Cut the yarn, leaving a tail for sewing.
Attach the ears, 3 stitches back from the top center, and 10 stitches between the ears.
Tail
Start with the main color.
- 7 sc into KA (7)
2-3. 7 sc (7)
Switch to the accent color. - 7 sc (7)
Switch back to the main color.
5-6. 7 sc (7)
Switch to the accent color.
- 7 sc (7)
8-25. Repeat rows 5-7, alternating colors (18 rows)
Do not stuff. Fold in half and crochet 3 sc through both edges.
Cut the yarn, leaving a tail for sewing. Attach the tail to the body after the legs are crocheted.
Muzzle
- Ch 7, from the second chain, 5 sc, 4 sc in one stitch, then on the other side of the chain: 5 sc, 4 sc in one stitch (18)
- 5 sc, 4 inc, 5 sc, 4 inc (26)
- 5 sc, (sc, inc)4, 5 sc, (sc, inc)4 (34)
4-7. 34 sc (4 rows)
Cut the yarn, leaving a tail for sewing. Attach the muzzle, 3 rows down from the neck and 6 rows up from the center.
Decoration
- Attach the eyes immediately above the muzzle, with 8 stitches between them.
- Attach the nose at the center of the 3rd row from the edge of the muzzle.
- Using the accent color plush yarn, embroider a line down a few rows and optionally add whiskers with short, random stitches.
- You can also embroider the bangs. Mark the hair sections – 5 rows down from the top center, 3 stitches between each section. Embroider two stripes in accent color for each section, with a middle stripe in white.
- Using white plush yarn, embroider the whites of the eyes.
- Embroider “claws” on the paws with plush yarn, about 3 stitches apart.
Congratulations! Your Tiger Timka is ready!