Free Crochet Bunny Masterclass by Irina Koptsova (@toys_by_ira)
In this tutorial, you will learn how to crochet a bunny using amigurumi techniques. You can use any yarn and an appropriate crochet hook for the project. You can choose to embellish the bunny’s face with embroidery, blush, or pre-made safety eyes for toys.
Materials and Tools
- Yarn (any type suitable for amigurumi)
- Crochet Hook (appropriate size for your yarn)
- Embroidery Thread (for facial details)
- Stuffing (for the toy)
- Ribbon (optional for decoration)
- Needle (for attaching parts)
- Scissors
Crochet Abbreviations
- KA – Magic ring
- sc – Single crochet
- inc – Increase
- dec – Decrease
- (…) x n – Repeat n times
Step-by-Step Instructions for the Amigurumi Bunny
Head
- Round 1: 6 sc in KA (6).
- Round 2: 6 inc (12).
- Round 3: (1 sc, inc) x 6 (18).
- Round 4: (2 sc, inc) x 6 (24).
- Round 5: (3 sc, inc) x 6 (30).
- Round 6: (4 sc, inc) x 6 (36).
- Round 7: (5 sc, inc) x 6 (42).
- Round 8: (6 sc, inc) x 6 (48).
- Round 9: (7 sc, inc) x 6 (54).
- Round 10: 54 sc.
- Round 11: (8 sc, inc) x 6 (60).
- Rounds 12-19: 60 sc (8 rounds).
- Round 20: (8 sc, dec) x 6 (54).
- Round 21: (7 sc, dec) x 6 (48).
- Round 22: (6 sc, dec) x 6 (42).
- Round 23: (5 sc, dec) x 6 (36).
- Round 24: (4 sc, dec) x 6 (30).
- Round 25: (3 sc, dec) x 6 (24).
- Round 26: (2 sc, dec) x 6 (18).
Stuff the head and continue crocheting the body using the same yarn.
Body
- Round 1: (2 sc, inc) x 6 (24).
- Round 2: (3 sc, inc) x 6 (30).
- Round 3: (4 sc, inc) x 6 (36).
- Round 4: 36 sc.
- Round 5: (5 sc, inc) x 6 (42).
- Round 6: 42 sc.
- Round 7: (6 sc, inc) x 6 (48).
- Round 8: 48 sc.
- Round 9: (7 sc, inc) x 6 (54).
- Round 10: 54 sc.
- Round 11: (8 sc, inc) x 6 (60).
- Round 12: 60 sc.
- Round 13: (9 sc, inc) x 6 (66).
- Round 14: 66 sc.
- Round 15: (10 sc, inc) x 6 (72).
- Round 16: 72 sc.
- Round 17: (10 sc, dec) x 6 (66).
- Round 18: (9 sc, dec) x 6 (60).
- Round 19: (8 sc, dec) x 6 (54).
- Round 20: (7 sc, dec) x 6 (48).
- Round 21: (6 sc, dec) x 6 (42).
- Round 22: (5 sc, dec) x 6 (36).
- Round 23: (4 sc, dec) x 6 (30).
- Round 24: (3 sc, dec) x 6 (24).
- Round 25: (2 sc, dec) x 6 (18).
- Round 26: (1 sc, dec) x 6 (12).
- Round 27: 6 dec (6).
Stuff the body and fasten off.
Arms (2 Pieces)
- Round 1: 6 sc in KA (6).
- Round 2: 6 inc (12).
- Rounds 3-5: 12 sc (3 rounds).
- Round 6: 6 dec (6).
Do not stuff the arms. Leave the yarn for sewing.
Legs (2 Pieces)
- Round 1: 6 sc in KA (6).
- Round 2: 6 inc (12).
- Round 3: (1 sc, inc) x 6 (18).
- Rounds 4-8: 18 sc (5 rounds).
- Round 9: (1 sc, dec) x 6 (12).
Do not stuff the legs. Leave the yarn for sewing.
Ears (2 Pieces)
- Round 1: 6 sc in KA (6).
- Round 2: 6 sc (6).
- Round 3: 6 inc (12).
- Round 4: 12 sc (12).
- Round 5: (1 sc, inc) x 6 (18).
- Rounds 6-10: 18 sc (5 rounds).
- Round 11: (1 sc, dec) x 6 (12).
- Round 12: 12 sc (12).
Do not stuff the ears. Leave the yarn for sewing.
Tail
- Round 1: 6 sc in KA (6).
- Round 2: 6 inc (12).
- Round 3: (1 sc, inc) x 6 (18).
- Round 4: 18 sc (18).
- Round 5: (1 sc, dec) x 6 (12).
Leave the yarn for sewing.
Assembly and Decoration
- Fold the arms and legs in half and sew them onto the body.
- Fold the ears in half and sew them onto the head.
- Attach the tail to the back of the bunny.
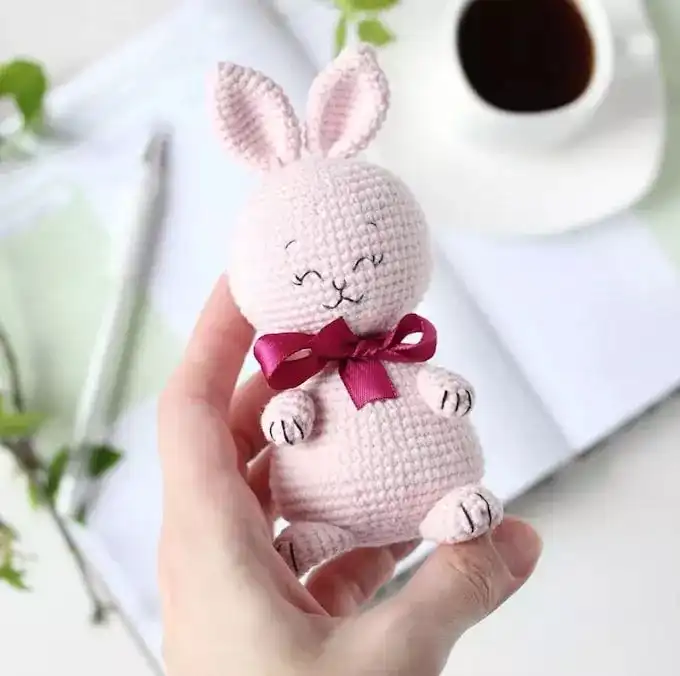
- Embroider the nose with pink thread.
- Use black thread to embroider the eyes, eyebrows, and mouth. You can also add stripes to the paws.
- Decorate the bunny with ribbons, bows, or flowers as desired.
Your Bunny is Ready! 🐰 Enjoy your handmade creation!