Hello Amigurumi Lovers and Beautiful Visitors!
I wanted to share the free amigurumi patterns for you here. In my article, I will share one pattern and how to make it for you. At the end of my article, I will also share amigurumi patterns that can generate ideas for you.
Materials and Tools
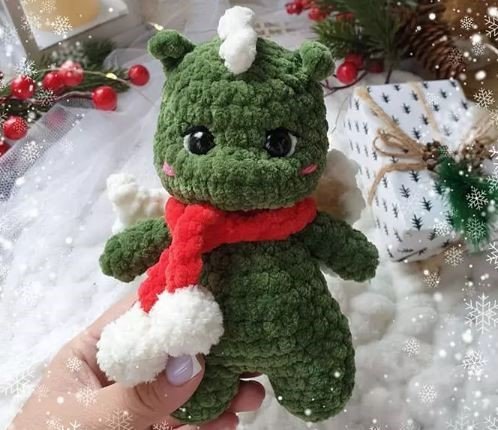
- YarnArt Dolce plush yarn: 772-khaki and 745-milk (body and comb)
- Fluffy yarn Alize Softy: white (for scarf and pom-poms)
- Thread for embroidering a face: black, pink, milky (eyes and cheeks)
- Hook: 4 mm
- Eyes for toys: 12 mm
- Filler for toys
- Knitting markers
- Pins
- Strong thread for tightening
- Needle for sewing parts
- Scissors
Legend
- KA – amigurumi ring
- ps – bias loop
- pp – half loop
- VP – air loop
- ss – connecting post
- sc – single crochet
- dc – double crochet
- pr – increase
- dec – decrease
- (…) x n – repeat n times
Handles (2 pcs)
- 6 sc in KA
- Rows 2-6: 6 sc (5 rows)
Do not stuff the part. Fold the handle in half and knit 3 sc on both sides. Fasten the thread and cut it.
Legs (2 pcs)
Cut the thread on the first leg, do not cut the second.
- 6 sc in KA
- 6 inc (12)
- Rows 3-4: 12 sc (2 rows)

Body
Continue to knit the body. Stuff tightly as you go.
- 2 ch, attach to the second leg, 12 sc on the second leg, 2 sc on the ch, 12 sc on the first leg, 2 sc on the ch (28)
- 12 sc, 2 inc, 13 sc (30) – increases are on the belly.
- 9 sc, dec, 8 sc, dec, 9 sc (28)
- 6 sc, dec, 12 sc, dec, 6 sc (26)
- 7 sc, dec, 8 sc, dec, 7 sc (24)
- 24 sc
- 10 sc, dec, 1 sc, dec, 9 sc (22)
- 9 sc, dec, 1 sc, dec, 8 sc (20)
- 8 sc, dec, 1 sc, dec, 7 sc (18)
- (dec, 1 sc) x 6 (12)
In the next row, knit handles. They should be on the sides, with 3 sc between them in the front and back.
15 row: 2 sc, 3 sc with handle, 3 sc, 3 sc with handle, 1 sc
Head
- 12 inc (24)
- (3 sc, inc) x 6 (30)
- Rows 18-20: 30 sc (3 rows)
- 21 row: 9 sc, 6 dec, 9 sc (24)
- Rows 22-24: 24 sc (3 rows)
- Insert eyes between 21-22 rows, 3 sc between the edges of the eyes.
- (2 sc, dec) x 6 (18)
- (1 sc, dec) x 6 (12)
- 6 dec
Pull the hole, fasten the thread, and hide.
Tightening and Decoration
Stage 1: Insert the thread at point 1, output at point 2, insert at point 3, output at point 4. Repeat, pulling the muzzle, and fasten.
Stage 2: Insert the thread at point 1, bring it out at point 7, insert at point 8, and bring it out at point 4. Tighten, forming a snout, and fasten.
Embroider whites of the eyes, eyelashes, and eyebrows. Embroider cheeks with pink thread.
Ears
Attach threads and shape the ears as described in your instructions.
Spikes, Wings, Tail, Scarf, and Pom-Poms
Follow the detailed instructions provided in your original text for these parts.
Feel free to tag me (@freeamigurumii) in your photos on Instagram or Facebook if you’d like!
All Finished!