Legs (continued):
- Body
- R9: 15 sc on the first leg, 3 sc in 3 ch, 15 sc on the second leg, 3 sc in 3 ch (opposite side) [36]
- R10-17: 36 sc (8 rows)
- Change to beige yarn:
- R18: BLO 36 sc
- R19: (4 sc, dec) repeat 6 times [30]
- R20-21: 30 sc (2 rows)
- R22: (3 sc, dec) repeat 6 times [24]
- R23-24: 24 sc (2 rows)
- R25: (2 sc, dec) repeat 6 times [18]
- R26: 18 sc
- R27: (1 sc, dec) repeat 6 times [12]
- Head (continued):
- R1: (inc) repeat 12 times [24]
- R2: (3 sc, inc) repeat 6 times [30]
- R3: (4 sc, inc) repeat 6 times [36]
- R4: (5 sc, inc) repeat 6 times [42]
- R5: (6 sc, inc) repeat 6 times [48]
- R6: (7 sc, inc) repeat 6 times [54]
- R7-12: 54 sc (6 rows)
- R13: (7 sc, dec) repeat 6 times [48]
- R14: (6 sc, dec) repeat 6 times [42]
- R15: (5 sc, dec) repeat 6 times [36]
- R16: (4 sc, dec) repeat 6 times [30]
- R17: (3 sc, dec) repeat 6 times [24]
- R18: (2 sc, dec) repeat 6 times [18]
- R19: (1 sc, dec) repeat 6 times [12]
- R20: (dec) repeat 6 times [6]
- Fasten off.
- Ears (make 2):
- R1: 6 sc in magic ring [6]
- R2: (inc) repeat 6 times [12]
- R3: (1 sc, inc) repeat 6 times [18]
- R4: (2 sc, inc) repeat 6 times [24]
- R5-8: 24 sc (4 rows)
- R9: (4 sc, dec) repeat 4 times [20]
- R10: 20 sc
- R11: (3 sc, dec) repeat 4 times [16]
- R12-13: 16 sc (2 rows)
- R14: (2 sc, dec) repeat 4 times [12]
- R15-17: 12 sc (3 rows)
- Don’t stuff with fiberfill.
- Fasten off and leave a long tail for sewing.
- Muzzle:
- R1: 6 sc in magic ring [6]
- R2: (inc) repeat 6 times [12]
- R3: (3 sc, 3 inc) repeat 2 times [18]
- R4: (2 sc, inc) repeat 6 times [24]
- R5: 24 sc
- Fasten off and leave a long tail for sewing.
- Arms (make 2):
- R1: 6 sc in magic ring [6]
- R2: (inc) repeat 6 times [12]
- R3: 12 sc
- R4: dec, 10 sc [11]
- R5: dec, 9 sc [10]
- R6-15: 10 sc (10 rows)
- Stuff the bottom part of the arm slightly.
- Fold the top opening flat and sc through both sides.
- Fasten off and leave a long tail for sewing.
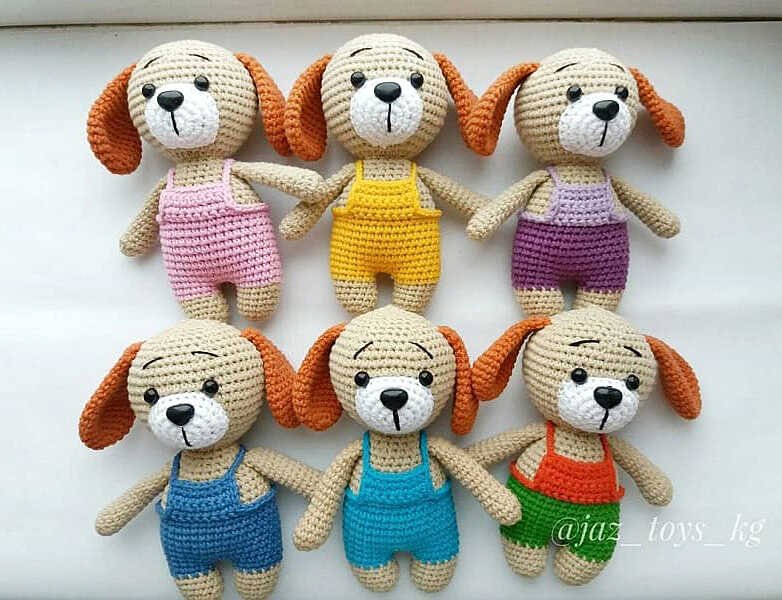
Assembly Instructions:
- Attach the ears:
Sew the ears to the top of the head, positioning them symmetrically. - Attach the muzzle:
Sew the muzzle to the front of the head. Make sure it aligns with the middle of the face, just below the eyes. - Attach the eyes and nose:
Attach the black safety eyes between rows 6 and 7 of the head. Place the nose just below the muzzle, using a plastic safety nose or embroidery floss to form the nose shape. - Sew the legs to the body:
Attach the legs to the bottom of the body. Position them evenly on either side, securing with a yarn needle. - Attach the arms:
Sew the arms to the body between rows 9 and 10 of the body. - Finish up:
Ensure all parts are securely sewn. Adjust the shape of the puppy and add any final touches like eyebrows or a smile using black embroidery floss.
Your cute Amigurumi Puppy Dog is now complete and ready to be gifted or displayed! Enjoy your creation!