Hello, dear Amigurumi followers! 🎉
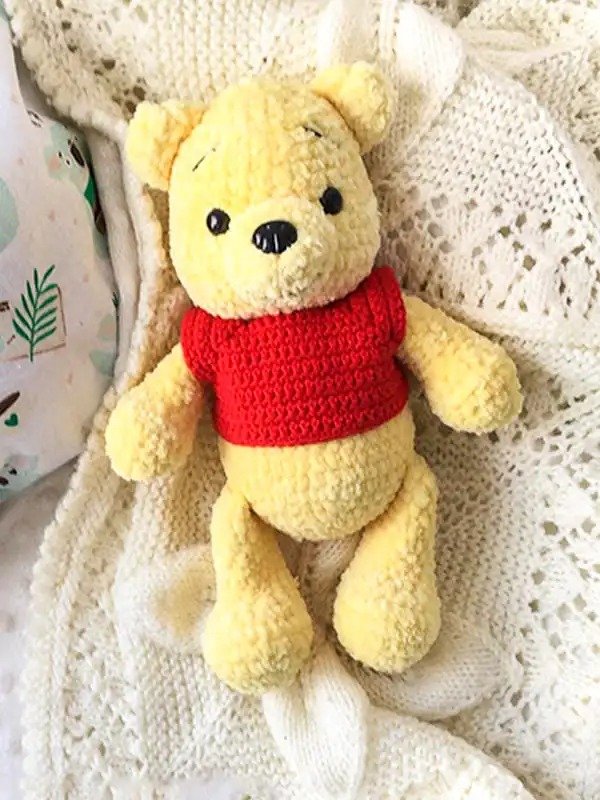
Today we are excited to share the Amigurumi Winnie The Pooh Bear Free Pattern with you! This beloved character will surely bring joy to any crochet enthusiast or fan of this classic bear. Let’s dive into the pattern and start creating your very own Pooh Bear!
Materials:
- Crochet hook: 3 mm
- Yarn:
- Plush yellow yarn (1 skein)
- Red yarn for the blouse (Yarn Art Jeans-90, black for embroidery)
- Eyes: 8 mm
- Filler for stuffing
- Thread for embroidery (for the muzzle)
The finished height of the Pooh Bear will be approximately 23 cm.
Abbreviations:
- MR – Magic Ring
- Sc – Single Crochet
- Inc – Increase
- Dec – Decrease
- Ch – Chain
Amigurumi Winnie The Pooh Bear Free Pattern:
Head:
- Rnd 1: 6 sc in MR (6)
- Rnd 2: 6 inc – (12)
- Rnd 3: (1 sc, 1 inc) x 6 – (18)
- Rnd 4: (2 sc, 1 inc) x 6 – (24)
- Rnd 5: (3 sc, 1 inc) x 6 – (30)
- Rnd 6-10: 30 sc (30)
- Rnd 11: 3 inc, 7 sc, 3 inc, 17 sc (36) – (Insert eyes in this row)
- Rnd 12: (1 sc, 1 inc) x 3, 7 sc, (1 sc, 1 inc) x 3, 17 sc (42)
- Rnd 13-14: 42 sc (42)
- Rnd 15: (5 sc, 1 dec) x 6 – (36)
- Rnd 16: (4 sc, 1 dec) x 6 – (30)
- Rnd 17: (3 sc, 1 dec) x 6 – (24) (Stuff the head)
- Rnd 18: (2 sc, 1 dec) x 6 – (18)
- Rnd 19: (1 sc, 1 dec) x 6 – (12)
Fasten off and cut the yarn.
Muzzle:
- Rnd 1: 6 sc in MR (6)
- Rnd 2: 6 inc – (12)
- Rnd 3: (1 sc, 1 inc) x 6 – (18)
- Rnd 4-5: 18 sc (18)
Ears (Make 2):
- Rnd 1: 6 sc in MR (6)
- Rnd 2: 6 inc – (12)
- Rnd 3: Fold the 12 sc in half and crochet the sides together. Fasten off and cut the yarn.
Legs (Make 2):
- Rnd 1: 6 sc in MR (6)
- Rnd 2: 6 inc – (12)
- Rnd 3: (1 sc, 1 inc) x 6 – (18)
- Rnd 4: (2 sc, 1 inc) x 6 – (24)
- Rnd 5-6: 24 sc (24)
- Rnd 7: 6 dec, 12 sc – (18)
- Rnd 8: 3 dec, 12 sc – (15) (Stuff the leg)
- Rnd 9-16: 15 sc (15)
- Rnd 17: Crochet 5 more sc to get to the middle. Fold in half and crochet the sides together. Fasten off and cut the yarn.
Arms (Make 2):
- Rnd 1: 6 sc in MR (6)
- Rnd 2: 6 inc – (12)
- Rnd 3: (2 sc, 1 inc) x 4 – (16)
- Rnd 4-5: 16 sc (16)
- Rnd 6: 4 dec, 8 sc – (12)
- Rnd 7-14: 12 sc (12)
- Rnd 15: Crochet 5 more sc, fold the sides together, and crochet. Fasten off and cut the yarn.
Body:
- Rnd 1: 6 sc in MR (6)
- Rnd 2: 6 inc – (12)
- Rnd 3: (1 sc, 1 inc) x 6 – (18)
- Rnd 4: (2 sc, 1 inc) x 6 – (24)
- Rnd 5: (3 sc, 1 inc) x 6 – (30)
- Rnd 6: (4 sc, 1 inc) x 6 – (36)
- Rnd 7: (5 sc, 1 inc) x 6 – (42)
- Rnd 8-11: 42 sc (42) (In the 8th row, crochet the legs)
- Rnd 12: (5 sc, 1 dec) x 6 – (36)
- Rnd 13-14: 36 sc (36)
- Rnd 15: (4 sc, 1 dec) x 6 – (30)
- Rnd 16: 30 sc (30)
- Rnd 17: (3 sc, 1 dec) x 6 – (24)
- Rnd 18-20: 24 sc (24) (In the 20th row, crochet the arms)
- Rnd 21: (2 sc, 1 dec) x 6 – (18)
- Rnd 22: 18 sc (18)
Sweater:
- Ch 31 (chain 31), and from the 2nd chain from the hook:
- Rnd 1: 4 sc, 3 sc in one loop, 5 sc, 3 sc in one loop, 8 sc, 3 sc in one loop, 5 sc, 3 sc in one loop, 4 sc – (38)
- Rnd 2: Ch, 5 sc, 3 sc in one loop, 7 sc, 3 sc in one loop, 10 sc, 3 sc in one loop, 7 sc, 3 sc in one loop, 5 sc – (46)
- Continue following the pattern in the description to shape the sweater.
Now that you’ve made all the pieces, assemble the bear by attaching the head, arms, legs, and ears to the body. Don’t forget to embroider the muzzle and facial features (like the nose and smile) for that cute Winnie the Pooh look! 🎉
Enjoy crocheting your Amigurumi Winnie The Pooh Bear and feel free to customize it with little details!