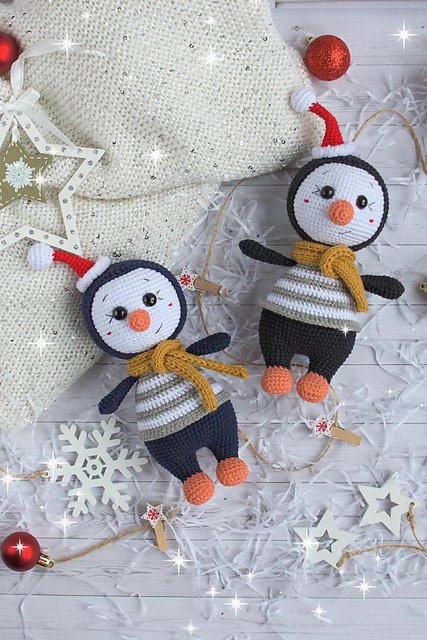
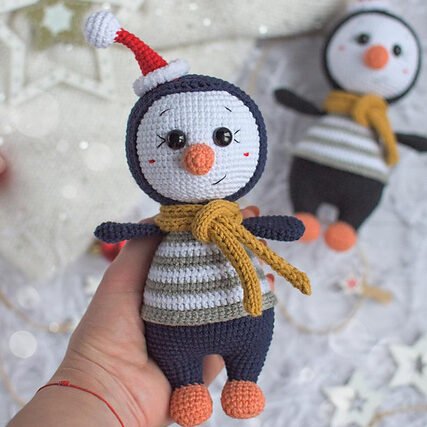
Materials:
- Yarn:
- Yarn Art Jeans (black, dark blue, orange, mustard, gray, white)
- Alize Softy (white)
- Hook: Clover №2
- Stuffing: Hollofayber
- Knitting Needles: №2.25
- Eyes: Black halfbeads (12 mm) or eyes with stalks
- Glue: Moment glue or glue gun
- Sewing Thread: Black (for muzzle decoration)
- Needles & Scissors: Thick needle for sewing parts together
The height of the toy is about 17.5 cm (without cap) and 22 cm (with cap).
Abbreviations:
- mc – magic circle
- ch – chain
- sl st – slip stitch
- sc – single crochet
- hdc – half double crochet
- dc – double crochet
- tr – treble crochet
- inc – increase (crochet two sc in 1 stitch)
- dec – decrease (crochet two sc together)
- bk lp – back loop
- fr lp – front loop
Key Steps to Make the Little Penguin:
Legs:
- Use orange yarn to crochet the feet, starting with a chain and working in rounds.
- Work through the heel and foot sections, making increases and decreases, and adding a chain to form the foot.
- Complete both legs the same way and attach black or dark blue yarn at the base for further details.

Wings:
- Crochet two details using black or dark blue yarn, focusing on the shaping of the wings.
- Stuff lightly, fold in half, and connect the edges.
Body:
- Attach the legs and crochet around both to form the body, using white and gray yarn for the transition.
- Include wing attachment, crochet in rounds, and change colors to create the distinct body shape.
- Continue working in spirals, making sure to stuff as you go for structure.
Head:
- The head is worked in two parts: detail №1 (white yarn) and detail №2 (black or dark blue yarn).
- Insert the eyes between rows and tighten with a needle.
- Attach the beak and finish off with embroidery for the facial details.
Cap and Scarf:
- Crochet the cap with white yarn, followed by a red section, and then attach it to the head.
- Knit a scarf using mustard yarn in stockinette stitch, ensuring it’s long enough to wrap around the penguin’s neck.
Assembly:
- Attach the head to the body, ensuring it’s tightly sewn for stability.
- Add the scarf, cap, and complete any finishing touches for facial features.
Final Look:
Your Little Penguin will be a charming, fully dressed, and adorable creation that will stand at around 22 cm with the cap. Enjoy your crochet project and the sweet penguin you’ll soon have!
Happy crocheting!