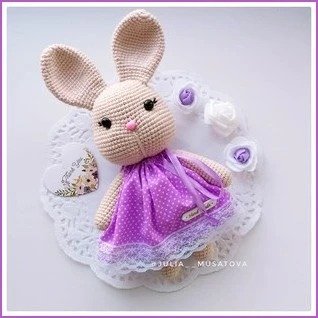
Amigurumi Bunny in Dress Free Pattern
This sweet bunny in a dress is a fun and adorable amigurumi project. The pattern provides clear instructions for making the bunny’s legs, body, arms, head, ears, and dress. You will need basic crochet skills and some simple sewing to assemble the pieces.
Materials:
- Yarn: Yarnart Jeans (or similar yarn)
- Hook: 2 mm crochet hook
- Eyes: 10-12 mm safety eyes
- Stuffing: Filler for toys (e.g., fiberfill)
- Satin Ribbon: 50 cm x 5 mm for the dress
- Lace: 40 cm for the dress trim
- Cotton Fabric: 40×40 cm for the dress
- Needle: For sewing
- Scissors
Size: The bunny will be approximately 20 cm in height.
Abbreviations:
- ch – chain
- st – stitch
- mr – magic ring
- sc – single crochet
- inc – increase (2 sc in the next st)
- dec – decrease (2 sc together)
- ss – slip stitch
- ( ) *6 – Repeat whatever is between the brackets the number of times stated
Amigurumi Bunny in Dress Free Pattern
Legs (Make 2):
- Rnd 1: Magic ring, 6 sc (6)
- Rnd 2: 6 inc (12)
- Rnd 3: (1 sc, inc) *6 (18)
- Rnd 4-18: sc in each st around (18) for 15 rounds
- Connect the legs by pulling 4 ch between the legs.
- Start the body from here.
Body:
- Rnd 19-29: 42 sc (11 rnds)
- Rnd 30: (5 sc, dec) *6 (36)
- Rnd 31-32: sc in each st around (36)
- Rnd 33: (4 sc, dec) *6 (30)
- Rnd 34-35: sc in each st around (30)
- Rnd 36: (3 sc, dec) *6 (24)
- Rnd 37-38: sc in each st around (24)
- Rnd 39: (2 sc, dec) *6 (18)
- Rnd 40: (sc, dec) *6 (12)
Tail:
- Rnd 1: Magic ring, 6 sc (6)
- Rnd 2: 6 inc (12)
- Rnd 3-5: sc in each st around (12)
- Rnd 6: 6 dec (6)
- Finish, do not stuff the tail.
Arms (Make 2):
- Rnd 1: Magic ring, 6 sc (6)
- Rnd 2: (sc, inc) *3 (9)
- Rnd 3: (2 sc, inc) *3 (12)
- Rnd 4: (3 sc, inc) *3 (15)
- Rnd 5-21: sc in each st around (15) for 21 rounds
- Rnd 22: (3 sc, dec) *3 (12)
- Rnd 23: 6 dec (6)
Head:
- Rnd 1: Magic ring, 6 sc (6)
- Rnd 2: 6 inc (12)
- Rnd 3: (sc, inc) *6 (18)
- Rnd 4: (2 sc, inc) *6 (24)
- Rnd 5: (3 sc, inc) *6 (30)
- Rnd 6: (4 sc, inc) *6 (36)
- Rnd 7: (5 sc, inc) *6 (42)
- Rnd 8: (6 sc, inc) *6 (48)
- Rnd 9: (7 sc, inc) *6 (54)
- Rnd 10-15: sc in each st around (54) for 6 rounds
- Rnd 16: (8 sc, inc) *6 (60)
- Rnd 17: (sc, inc) *4, 5 sc, 2 inc, 5 sc, (inc, sc) *4, 32 sc (70)
- Place the eyes above the 17th row, leaving 10 sts between them.
- Rnd 18-24: sc in each st around (70) for 8 rounds
- Rnd 25: (8 sc, dec) *7 (63)
- Rnd 26: (7 sc, dec) *7 (56)
- Rnd 27: (6 sc, dec) *7 (49)
- Rnd 28: (5 sc, dec) *7 (42)
- Rnd 29: (4 sc, dec) *7 (35)
- Rnd 30: (3 sc, dec) *7 (28)
- Stuff the head with fiberfill.
- Rnd 31: (2 sc, dec) *7 (21)
- Rnd 32: (sc, dec) *7 (14)
Ears (Make 2):
- Rnd 1: Magic ring, 6 sc (6)
- Rnd 2: 6 inc (12)
- Rnd 3: (sc, inc) *6 (18)
- Rnd 4-6: sc in each st around (18)
- Rnd 7: (5 sc, inc) *3 (21)
- Rnd 8-10: sc in each st around (21)
- Rnd 11: (5 sc, dec) *3 (18)
- Rnd 12-15: sc in each st around (18)
- Rnd 16: (4 sc, dec) *3 (15)
- Rnd 17-20: sc in each st around (15)
- Rnd 21: (3 sc, dec) *3 (12)
- Fold the ear in half and crochet 6 sc across the edges. Do not stuff.
Dress:
- Fabric: Cut two rectangles of cotton fabric (each 20 cm x 10 cm).
- Hemming: Fold and hem all four sides of the fabric rectangles to hide the raw edges.
- Hem the sides first, then the top and bottom.
- Run a satin ribbon through the top hem for tying the dress around the bunny.
- Sew lace along the bottom of the dress.
- Sew the two fabric rectangles together along the sides, from the bottom to the middle.
- At the top of the dress, make a fold where you pass the satin ribbon through both parts of the dress.
- Tie the ribbon at the side of the bunny’s body, securing it on one “shoulder”.
- Add pleats or gathering at the top of the dress to create a fitted look.
Assembly:
- Sew the arms and tail onto the body.
- Attach the head to the body securely.
- Sew the ears onto the head.
- Dress your bunny in the cute dress you made with fabric and lace, tying it with the satin ribbon.
- Optionally, add a bow or embellishment to the dress for extra cuteness.
Your Amigurumi Bunny in Dress is ready to be admired! Enjoy your crochet project and the finished bunny that’s sure to charm everyone with its adorable outfit!