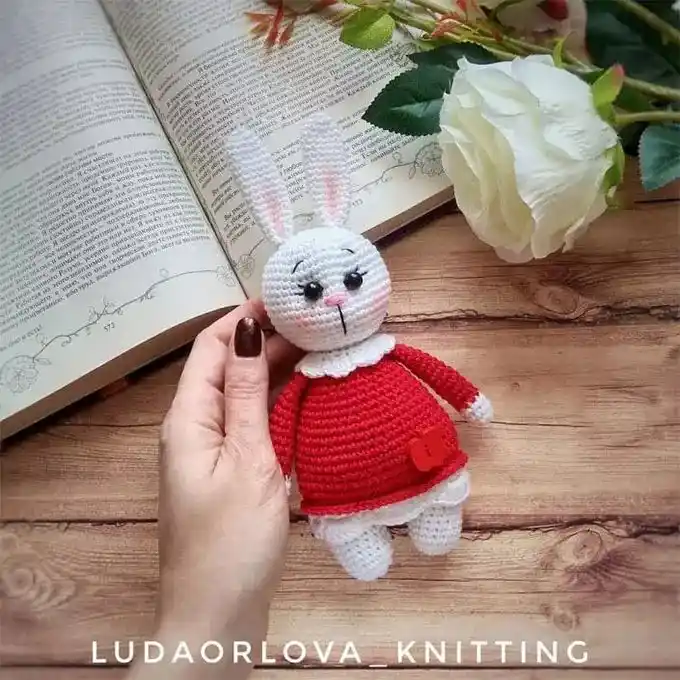
Free Crochet Masterclass: Cute Bunny by Lyudmila Orlova (@o_lyudmila)
In this tutorial, you will learn how to crochet a small bunny with a dress and a collar. The bunny is crocheted in one piece, with the arms worked directly into the body. The collar and dress edging are crocheted the same way. You can gently tint the inner part of the ears and the cheeks with soft pink pastel or blush.
To decorate the toy, consider adding a beautiful decorative button.
Materials and Tools Needed:
- Yarn: white (for the bunny), red (for the dress), black (for the eyes, eyebrows, and mouth), pink (for the nose)
- Crochet hook
- Safety eyes for toys
- Toy stuffing
- Dry pastels or blush (for tinting)
- Decorative button
- Needle for sewing parts
- Scissors
Abbreviations:
- KA — Magic ring (amigurumi)
- вп — Chain stitch
- сбн — Single crochet
- ссн — Double crochet
- пр — Increase
- уб — Decrease
- (…) х n — Repeat n times
Crocheting the Amigurumi Bunny
Arms (2 parts):
- Round 1: 6 sc into the magic ring (KA)
- Round 2: (1 sc, increase) x 3 (9 stitches)
- Rounds 3-4: 9 sc
- Change color (if desired)
- Rounds 5-18: 9 sc
Legs (2 parts):
- Round 1: 8 sc into the magic ring (KA)
- Round 2: 8 increases (16 stitches)
- Rounds 3-9: 16 sc
- Connect the legs with 3 chain stitches between them, then join the second leg. Proceed to crochet the body.
Body:
- Round 1: 16 sc, 3 sc, 16 sc, 3 sc (create 4 increases on the edges of the body) (42 stitches)
- Round 2: (6 sc, increase) x 6 (48 stitches)
- Round 3: (7 sc, increase) x 6 (54 stitches)
- Round 4: 54 sc in a different color
- Rounds 5-6: 54 sc in the front loop of the stitches
- Round 7: 54 sc in the back loop of the stitches (4 rows)
- Rounds 8-9: 54 sc
- Round 10: (7 sc, decrease) x 6 (48 stitches)
- Rounds 11-12: 48 sc
- Round 13: (6 sc, decrease) x 6 (42 stitches)
- Rounds 14-15: 42 sc
- Round 16: (5 sc, decrease) x 6 (36 stitches)
- Round 17: 36 sc
- Round 18: (4 sc, decrease) x 6 (30 stitches)
- Round 19: (3 sc, decrease) x 6 (24 stitches)
- Round 20: 24 sc
- Round 21: (2 sc, decrease) x 6 (18 stitches)
- Round 22: Crochet arms directly into the body (18 stitches)
Collar Edging:
- Round 1: 18 sc
- Round 2: 3 chain stitches, then work 3 dc in each of the next 3 stitches.
- Round 3: Crochet into the chain space from the previous row, 3 dc (or more if desired), one in each chain space. Repeat the same edging for the dress.
Ears (2 parts):
- Round 1: 6 sc into the magic ring (KA)
- Round 2: (1 sc, increase) x 3 (9 stitches)
- Round 3: (2 sc, increase) x 3 (12 stitches)
- Rounds 4-18: 12 sc
Head:
- Round 1: 6 sc into the magic ring (KA)
- Round 2: (1 sc, increase) x 6 (9 stitches)
- Round 3: 9 increases (18 stitches)
- Round 4: (2 sc, increase) x 6 (24 stitches)
- Round 5: (3 sc, increase) x 6 (30 stitches)
- Round 6: (4 sc, increase) x 6 (36 stitches)
- Round 7: (5 sc, increase) x 6 (42 stitches)
- Round 8: (6 sc, increase) x 6 (48 stitches)
- Rounds 9-16: 48 sc
- Round 17: (6 sc, decrease) x 6 (42 stitches)
- Round 18: (5 sc, decrease) x 6 (36 stitches)
- Round 19: (4 sc, decrease) x 6 (30 stitches)
- Round 20: (3 sc, decrease) x 6 (24 stitches)
- Round 21: (2 sc, decrease) x 6 (18 stitches)
Once you have finished crocheting the bunny, you can stuff the body and head lightly. Then, sew on the arms, legs, and ears. Position the eyes and attach the nose and mouth with black yarn.
Optional: You can also use soft pink blush or pastels to add a gentle tint to the cheeks and the inside of the ears.
Congratulations! Your cute crochet bunny is now complete and ready for display or gifting.
Feel free to add your favorite decorations like a bow or a button to make it even more special!