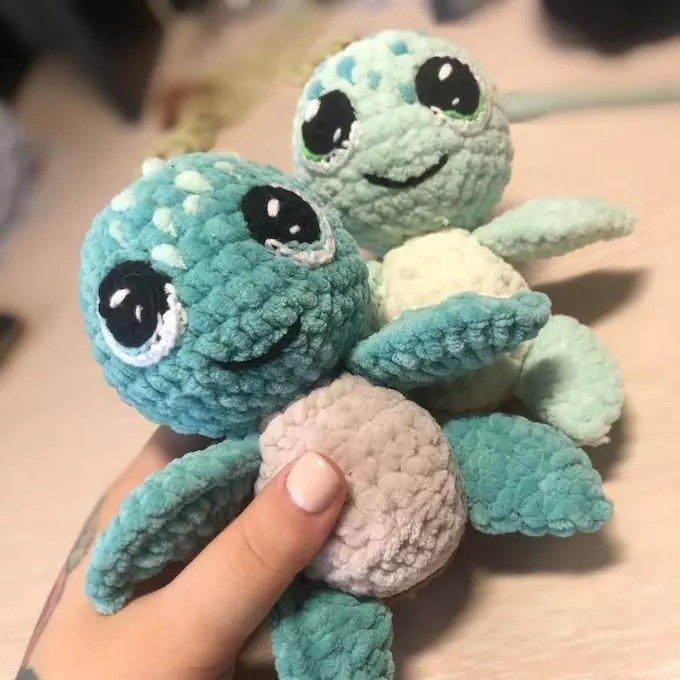
Free Crochet Masterclass: Crocheting a Plush Turtle by Lesya Chashchina (@amiguruminka_35)
In this guide, you’ll learn how to crochet a cute plush turtle. For amigurumi crochet, any plush yarn is suitable, such as Himalaya Dolphin Baby, YarnArt Dolce, Nako Panda Baby, and others. All parts of the turtle are crocheted in a spiral and stuffed as you go. The eyes are fully crocheted using YarnArt Jeans yarn.
The finished turtle will be approximately the size of your palm, and it can be used as a keychain or decorative item.
Materials and Tools Needed:
- Plush yarn: two colors (main color)
- YarnArt Jeans: white, black, green (for the eyes)
- Crochet hooks: 1.75-2 mm and 4 mm
- Stuffing for the toy
- Pins
- Needle for sewing parts
- Scissors
You can purchase all the necessary materials here.
Abbreviations:
- KA — Magic ring
- ch — Chain stitch
- ss — Slip stitch
- sc — Single crochet
- dc — Double crochet
- pssn — Half double crochet
- pr — Increase
- dec — Decrease
- (…) x and — Repeat n times
Crocheting the Amigurumi Turtle
Head:
- 9 sc into the magic ring
- Increase: 9 (18 stitches)
- (2 sc, increase) x 6 (24 stitches)
- (3 sc, increase) x 6 (30 stitches)
- 30 sc (3 rows)
- (4 sc, increase) x 6 (36 stitches)
- 36 sc (2 rows)
- (4 sc, decrease) x 6 (30 stitches)
- (3 sc, decrease) x 6 (24 stitches)
- (2 sc, decrease) x 6 (18 stitches)
- Insert the stuffing
- (1 sc, decrease) x 6 (12 stitches)
- 6 decreases (6 stitches)
Shell:
- 6 chain stitches
- Starting from the second chain from the hook: 1 sc, 2 hdc, 1 sc, 3 sc in one stitch, 1 sc, 2 hdc, 1 sc, 3 sc in one stitch (14 stitches)
- 1 hdc, 2 dc, 1 hdc, 3 increases, 1 hdc, 2 dc, 1 hdc, 3 increases (20 stitches)
- 1 hdc, 2 dc, 1 hdc, (1 sc, increase) x 3, 1 hdc, 2 dc, 1 hdc, (1 sc, increase) x 3 (26 stitches)
- (sc) 1 hdc, 4 dc, 1 hdc, increase, 2 sc, increase, 2 sc, 1 increase of 1 sc and 1 hdc, 4 dc, (2 hdc, increase, 1 hdc) x 3 (32 stitches)
- 1 dc, 20 sc, increase, 2 hdc, 4 increases of hdc, 2 hdc, increase, 1 sc (38 stitches)
- 38 sc into the front loop
- 3 dc into the front loop, chain stitch, cut the yarn
Belly:
Crochet in back loops with turning rows.
- 5 chain stitches
- From the second chain from the hook: increase, 2 sc, increase (6 stitches)
- 2 chain stitches, 6 hdc
- 2 chain stitches, increase hdc, 4 hdc, increase hdc (8 stitches)
- 2 chain stitches, 8 hdc (2 rows)
- 2 chain stitches, decrease hdc, 4 hdc, decrease hdc (6 stitches)
- Chain stitch, decrease sc, 2 sc, decrease sc (4 stitches)
- Chain stitch, crochet around the belly.
Upper Legs (2 parts):
- 8 chain stitches
- 8 increases (16 stitches)
- (1 sc, increase) x 8 (24 stitches)
- Fold the piece in half and crochet together with 12 sc.
Lower Legs (2 parts):
- 6 chain stitches
- 6 increases (12 stitches)
- (1 decrease, increase) (18 stitches)
- Fold in half and crochet together with 9 sc.
Eyes (2 parts):
- Crochet 9 chain stitches with black yarn in a magic ring
- In the following rows, crochet into the back loop:
- Row 3: 9 increases at the last increase, change to blue (18 stitches)
- Row 4: 2 dc, 2 sc, 2 dc, change color to white, 2 dc, change color to black, 9 dc, change color to white, 1 dc (18 stitches)
- Row 5: dc, 1 sc, 2 increases, 2 sc, 2 increases, 2 dc (22 stitches)
Assembling and Finishing the Toy
Insert the belly into the shell and secure with pins. Attach the first pin at the start of the shell row, then count back 13 stitches to attach the second side of the belly to the 14th stitch.
Sew on the head, starting from the front. During sewing, fold back the top part of the shell and sew the head into place.
Attach the upper legs by stitching them 1 row below the head.
Sew the lower legs, positioning them 3-4 rows below the shell, where the shell and belly meet.
Attach the eyes between rows 5-9, ensuring that the distance between them is 3-4 sc.