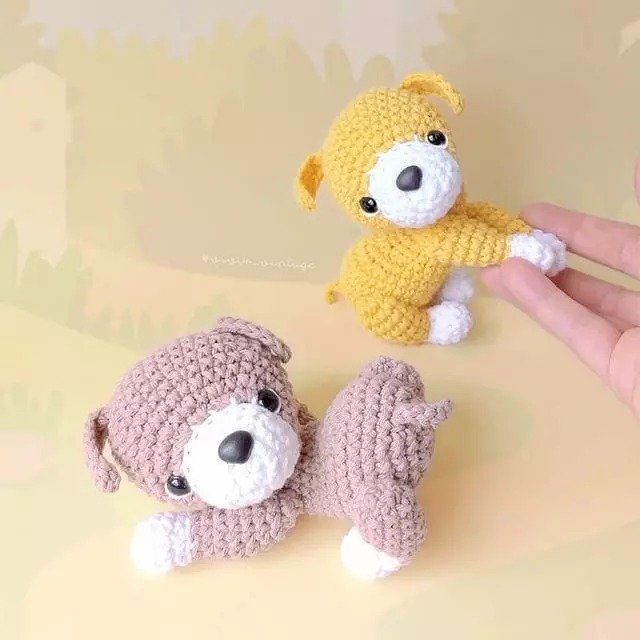
Free Crochet Masterclass: How to Crochet a Puppy by @nivіr_vіntаge
Translation by Irina Mexedova
In this masterclass, you will learn how to crochet a cute little puppy. The crocheted puppy will have four paws and can be made with any yarn suitable for amigurumi. For this project, we suggest using a yarn like YarnArt Jeans with a 2.5 mm hook. All parts are crocheted separately, and the paws and tail are sewn on, while the ears are crocheted directly as part of the head.
Materials and Tools
- Any yarn of your choice
- Suitable crochet hook for your yarn
- Safety eyes for the toy
- Nose for the toy
- Stuffing for the toy
- Yarn for sewing
- Needle for attaching parts
- Scissors
You can purchase all the necessary materials here.
Abbreviations
- KA — Magic ring (adjustable loop)
- v.p. — Chain stitch
- sc — Single crochet
- dc — Double crochet
- hdc — Half double crochet
- inc — Increase
- dec — Decrease
- (…) x n — Repeat n times
Crochet Pattern for the Amigurumi Puppy
Head
Start with white yarn. Fill in as you go. Insert the safety eyes between rounds 6 and 7, 6 stitches apart.
- Round 1: Magic ring, 6 sc (6)
- Round 2: 6 inc (12)
- Round 3: (1 sc, inc) x 6 (18)
- Rounds 4-5: 18 sc (2 rounds)
- Change to light brown yarn.
- Round 6: Working in the back loops only: 6 sc, 6 inc, 6 sc (24)
- Round 7: 6 sc, (1 sc, inc) x 6, 6 sc (30)
- Round 8: 30 sc
- Round 9: (4 sc, inc) x 6 (36)
- Rounds 10-13: 36 sc (4 rounds)
In the next round, we will crochet the ears.
- Round 14: 13 sc, then make the first ear:
- Ch 9, in the second chain from hook, make 1 hdc, 5 dc, 1 hdc, sl st, 11 sc.
Then make the second ear: - Ch 9, in the second chain from hook, make 1 hdc, 5 dc, 1 hdc, sl st, 12 sc (36)
- Round 15: 36 sc
- Round 16: (4 sc, dec) x 6 (30)
- Round 17: (3 sc, dec) x 6 (24)
- Round 18: (2 sc, dec) x 6 (18)
- Round 19: (1 sc, dec) x 6 (12)
- Round 20: 6 dec
Body
Switch to light brown yarn. Stuff as you go.
- Round 1: Magic ring, 6 sc
- Round 2: 6 inc (12)
- Round 3: (1 sc, inc) x 6 (18)
- Round 4: (2 sc, inc) x 6 (24)
- Round 5: (3 sc, inc) x 6 (30)
- Rounds 6-8: 30 sc (3 rounds)
- Round 9: 9 sc, 6 dec, dec (24)
- Round 10: 24 sc
- Rounds 11-14: 18 sc (3 rounds)
- Round 15: 3 sc, 6 dec, 3 sc (12)
- Rounds 16-18: 12 sc (3 rounds)
- Round 19: 6 dec
Close the hole with a sl st, secure the yarn, and hide the ends inside the body.
Tail
Use light brown yarn.
- Round 1: Ch 8, from the second chain from the hook: 7 dc.
Secure the yarn and leave a tail for attaching to the body.
Paws (4 Parts)
Start with white yarn. Stuff as you go.
- Round 1: Magic ring, 5 sc
- Round 2: 5 inc (10)
3-4. Rounds 3-4: 10 sc (2 rounds) - Round 5: (2 sc, dec) x 2, 2 sc (8)
- Change to light brown yarn
- Round 6: Working in the back loops only, 8 sc
- Round 7: 8 sc
- Round 8: (2 sc, inc) x 2, 2 sc (10)
- Rounds 9-12: 10 sc (4 rounds)
- Round 13: 5 dec
Secure the yarn and leave a long tail for attaching to the body.
Assembling the Toy
- Attach the tail to the body at the center, between rounds 3 and 4.
- Attach the paws to the sides of the body.
- Attach the head to the top of the body, slightly turned to the side.
- Embroider the whites of the eyes with white yarn.
- Attach a plastic nose or embroider one with black yarn on the muzzle.