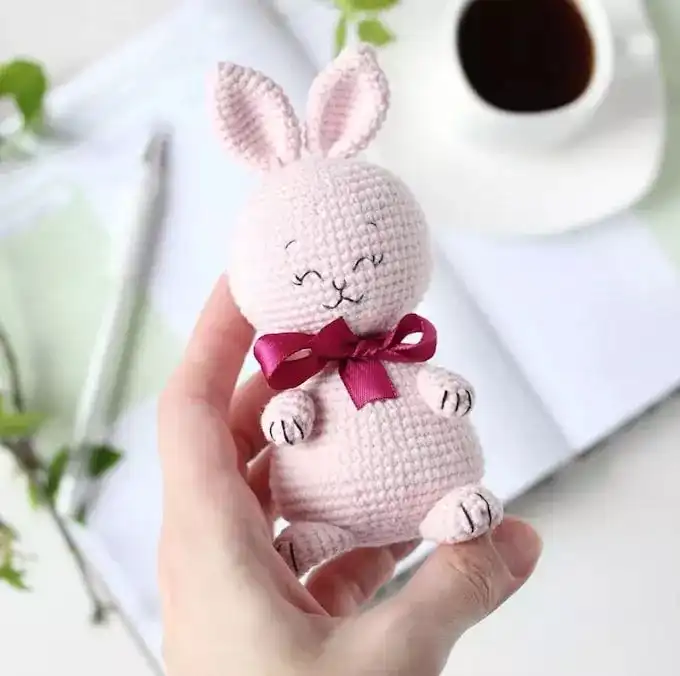
Free Crochet Masterclass: “Shustrik the Bunny” by Anna Ivanova (@ivanovaivanovaas)
In this tutorial, you will learn how to crochet a cute plush bunny named Shustrik. This adorable little bunny with thin legs is made using amigurumi techniques. For this project, you can use any plush yarn, such as YarnArt Dolce, Himalaya Dolphin Baby, or Etrofil Yonca Baby, among others.
The bunny’s ears are crocheted back-and-forth (in rows), while all other parts are worked in spirals. To decorate the bunny, you can add a bow around its neck using ribbon.
Materials and Tools
- Plush yarn
- Embroidery thread and yarn for shaping the face
- Crochet hook (4.5 mm)
- Safety eyes (10-12 mm)
- Safety nose (10-12 mm)
- Toy stuffing
- Glue
- Needle for attaching details
- Scissors
Crochet Abbreviations
- KA — Magic ring (amigurumi ring)
- ss — Slip stitch
- ch — Chain stitch
- sc — Single crochet (UK: double crochet)
- inc — Increase (add a stitch)
- dec — Decrease (remove a stitch)
- (…) x n — Repeat n times
Step-by-Step Instructions: Shustrik the Bunny
Legs (2 parts)
Start by crocheting the foot, and stuff it as you go:
- Round 1: 6 sc in KA (6)
- Round 2: 6 inc (12)
- Round 3: (3 sc, inc) x 3 (15)
- Rounds 4-6: 15 sc (15)
- Round 7: (3 sc, dec) x 3 (12)
- Round 8: 12 sc (12)
- Round 9: (2 sc, dec) x 3 (9)
- Round 10: 9 sc (9)
- Round 11: (1 sc, dec) x 3 (6)
Finish off and close the hole.
Foot (continued):
- Join the yarn to the second-to-last round and form a row of 6 sc.
- Continue crocheting 10 more rounds of 6 sc.
- Fold and crochet 3 sc together, then cut the yarn.
- Do not stuff the legs. They will be attached to the body later.
Arms (2 parts)
Stuff only the bottom part lightly:
- Round 1: 6 sc in KA (6)
- Round 2: 6 inc (12)
- Rounds 3-4: 12 sc (12)
- Round 5: 6 dec (6)
- Rounds 6-12: 6 sc (6)
Finish off and leave a long tail for sewing. The arms will be attached to the body later.
Body
Stuff the body as you crochet:
- Round 1: 6 sc in KA (6)
- Round 2: 6 inc (12)
- Round 3: (1 sc, inc) x 6 (18)
- Round 4: (inc, 2 sc) x 6 (24)
- Round 5: (3 sc, inc) x 6 (30)
- Round 6: 3 sc, 3 sc (with legs), 15 sc, 3 sc (with legs), 6 sc (30)
- Rounds 7-8: 30 sc (30)
- Round 9: 6 sc, (3 sc, dec) x 3, 9 sc (27)
- Round 10: 27 sc (27)
- Round 11: 27 sc + 2 stitches for shifting
- Round 12: 6 sc, (2 sc, dec) x 3, 9 sc (24)
- Rounds 13-14: 24 sc (24)
- Round 15: (2 sc, dec) x 6 + 1 stitch for shifting (18)
- Round 16: 3 sc, 3 sc (with arms), 3 dec, 3 sc (with arms), 3 sc (15)
Stuff the body and shape a small tummy.
- Round 17: (3 sc, dec) x 3 (12)
Head
Start crocheting the head:
- Round 1: 12 inc (24)
- Round 2: (3 sc, inc) x 6 (30)
- Round 3: (4 sc, inc) x 6 (36)
- Rounds 4-8: 36 sc (36)
In the last round, make 2-3 stitches for shifting. The marker should pass through the back center of the round, and we will do decreases on the sides of the head.
- Round 9: 6 sc, 3 dec, 12 sc, 3 dec, 6 sc (30)
- Round 10: (3 sc, dec) x 6 (24)
- Round 11: 24 sc (24)
Place the safety eyes between rounds 8 and 9 of the head, with about 3 sc between them. Make sure the neck area is well-stuffed.
- Round 12: (2 sc, dec) x 6 (18)
- Round 13: (2 sc, dec) x 6 (18)
- Round 14: (1 sc, dec) x 6 (12)
- Round 15: (1 sc, dec) x 6 (12)
- Round 16: 6 dec
Finish off and close the hole.
Shaping the Face
Make standard face shaping with eye indentations and nose shaping. Embroider the eyelashes and eyebrows, and attach the nose.
Tail
- Round 1: 6 sc in KA (6)
- Round 2: 6 inc (12)
- Round 3: 7 dec (7)
Leave a long tail for sewing. Attach the tail to the body.
Ears (2 parts)
- Chain 15 from the second chain from the hook, then crochet 13 sc in the same chain, 3 sc in the last chain, and then continue 12 sc on the other side.
- Round 1: 13 sc, 3 inc, 14 sc
- Round 2: 13 sc, (1 sc, inc) x 3, 14 sc
- Round 3: Fold and crochet 2 slip stitches, cut the yarn, and leave a tail for sewing.
Sew the ears to the head, leaving 1-2 rows from the closing stitch.
Conclusion
Your cute Shustrik the Bunny is now ready! You can decorate it with a ribbon bow around its neck for a final touch. Enjoy your handmade plush creation!