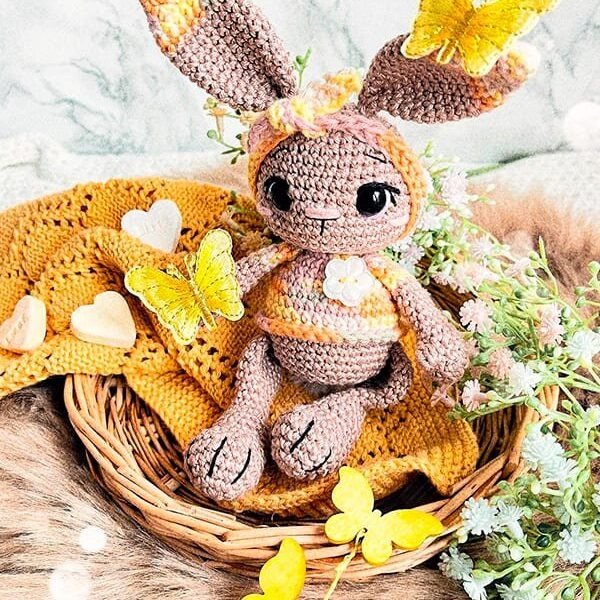
Bunny Lotta Amigurumi Free Pattern
Hello, amigurumi lovers and beautiful visitors! I wanted to share a free amigurumi pattern with you. In this article, I’ll walk you through creating this adorable Bunny Lotta. At the end, I will also provide some additional patterns for inspiration. Let’s get started!
Materials
- Cotton yarn (e.g., Scheepjes Catona, Schachenmayr Catania) 125m/50g
- 1 ball in light brown (about 35g)
- Ricorumi Print DK (001 Pink Yellow) for the sweater
- Scheepjes Furry Tales in white (for the fluffy bunny tail)
- Safety eyes 10mm
- White/black/purple cotton waste yarn for the eyes, pink for the cheeks and nose
- Embroidery thread for details (white/black)
- Crochet hooks 2.5mm and 3.00mm (for the fluffy bunny tail)
- Scissors
- Darning needle, embroidery needle (for tensioning the eyes)
- Markers, pins
- Fiberfill/stuffing
- Optional: A small button for the sweater
If you use the same yarn and hook size, your Bunny Lotta will be approximately 18cm tall.
Abbreviations
- MR – Magic Ring
- Rd – Round
- Sc – Single crochet
- Sl st – Slip stitch
- Ch – Chain
- Inc – Increase
- Dec – Decrease
- FLO – Front loop only
- BLO – Back loop only
- Hdc – Half double crochet
- Bs – Bobble stitch (4 dc chained off together)
- Hs – Hook size
Head (Brown)
- Rnd 1: 6 sc in MR (6)
- Rnd 2: (inc)6 (12)
- Rnd 3: (1sc, inc)6 (18)
- Rnd 4: (2sc, inc)6 (24)
- Rnd 5: (3sc, inc)6 (30)
- Rnd 6: 30 sc (30)
- Rnd 7: (4sc, inc)6 (36)
- Rnd 8-9: 36 sc (2 rounds) (36)
- Rnd 10: (5sc, inc)6 (42)
- Rnd 11: 42 sc (42)
- Rnd 12: (6sc, inc)6 (48)
- Rnd 13-14: 48 sc (2 rounds) (48)
- Rnd 15: (6sc, dec)6 (42)
Insert eyes in round 11/12, ensuring there is a 7-stitch gap between them.
- Rnd 16: (5sc, dec)6 (36)
- Rnd 17: (4sc, dec)6 (30)
- Rnd 18: (3sc, dec)6 (24)
- Rnd 19: (dec)12 (12)
- Rnd 20: FLO 12 sc (12)
Firmly stuff the head with fiberfill, starting after Rd 18 and before continuing with the body. Shape the head while stuffing, focusing extra filling in the cheeks to widen the bottom of the head. Leave the yarn attached as you move on to the body.
Body
Change to Ricorumi Print DK yarn for the sweater.
- Rnd 21: (inc)12 (24)
- Rnd 22-23: 24 sc (2 rounds) (24)
- Rnd 24: (3sc, inc)6 (30)
- Rnd 25: (4sc, inc)6 (36)
- Rnd 26-28: 36 sc (3 rounds) (36)
Change to brown yarn.
- Rnd 29: BLO 36 sc (36)
- Rnd 30-32: 36 sc (3 rounds) (36)
- Rnd 33: (4sc, dec)6 (30)
- Rnd 34: (3sc, dec)6 (24)
- Rnd 35: (2sc, dec)6 (18)
- Rnd 36: (1sc, dec)6 (12)
- Rnd 37: (dec)6 (6)
Stuff the body firmly with fiberfill, starting at Rd 35. Close the hole by pulling the yarn through the FLO of the remaining 6 sc.
For the sweater cuffs, turn the body upside down and crochet with Ricorumi Print DK in the front loops of Rd 29, adding 1 sc in each of the 36 loops. Finish off with a sl st and hide the ends in the body.
Ears (Make 2)
Start with Ricorumi Print DK.
- Rnd 1: 6 sc in MR (6)
- Rnd 2: 6 sc (6)
- Rnd 3: (1sc, inc)3 (9)
- Rnd 4: (2sc, inc)3 (12)
- Rnd 5: (3sc, inc)3 (15)
- Rnd 6: (4sc, inc)3 (18)
- Rnd 7-8: 18 sc (2 rounds) (18)
Change to brown yarn.
- Rnd 9-14: 18 sc (6 rounds) (18)
- Rnd 15: (4sc, dec)3 (15)
- Rnd 16: (3sc, dec)3 (12)
- Rnd 17: (2sc, dec)3 (9)
- Rnd 18: (1sc, dec)3 (6)
Close the opening with 3 sc, leaving a long tail for sewing the ears later. The ears should not be stuffed. Fold the bottom part of the ears in half and sew them together, forming a small wrinkle.
Arms (Make 2)
Start with brown yarn.
- Rnd 1: 6 sc in MR (6)
- Rnd 2: (inc)6 (12)
- Rnd 3-4: 12 sc (2 rounds) (12)
- Rnd 5: BS, 11 sc (12)
- Rnd 6: (2sc, dec)3 (9)
Stuff the bottom part of the arms lightly.
- Rnd 7-11: 9 sc (5 rounds) (9)
Change to Ricorumi Print DK.
- Rnd 12-15: 9 sc (4 rounds) (9)
The top part of the arms is not stuffed. Close the opening with 4 sc, leaving a long tail for sewing later.
Legs (Make 2)
Start with brown yarn.
- Rnd 1: 6 sc in MR (6)
- Rnd 2: (inc)6 (12)
- Rnd 3: (1sc, inc)6 (18)
- Rnd 4: (2sc, inc)6 (24)
- Rnd 5-6: 24 sc (2 rounds) (24)
- Rnd 7: 6sc, (dec)6, 6sc (18)
- Rnd 8: 6sc, (dec)3, 6sc (15)
- Rnd 9: 15 sc (15)
- Rnd 10: (3sc, dec)3 (12)
- Rnd 11-12: 12 sc (2 rounds) (12)
Stuff the bottom part of the legs with fiberfill.
- Rnd 13: (2sc, dec)3 (9)
- Rnd 14-15: 9 sc (2 rounds) (9)
- Rnd 16: (2sc, inc)3 (12)
- Rnd 17: (3sc, inc)3 (15)
- Rnd 18: (4sc, inc)3 (18)
- Rnd 19-20: 18 sc (2 rounds) (18)
- Rnd 21: (1sc, dec)6 (12)
- Rnd 22: (dec)6 (6)
The top part of the legs does not get stuffed. Close the hole and leave a long tail for sewing the legs to the body. Embroider details for the paws using thin black thread, dividing the paw into 4 parts with 3 lines.
Fluffy Tail
(Scheepjes Furry Tales, Hs 3.00mm)
- Rnd 1: 6 sc in MR (6)
- Rnd 2: (inc)*6 (12)
- Rnd 3: 12 sc (12)
Finish the round with a sl st and hide the yarn inside the tail. You can sew it to the body with cotton thread or use a small white pompom as an alternative.
Headband
(Ricorumi Print DK)
- Chain 61 and start in the 2nd ch from the hook: 1 sl st, 59 sc, 1 sl st.
- Cut the yarn, tie the ends together, and secure.
Assembly Instructions
Head Assembly:
- Use white cotton yarn for the eyerim and purple for small accents.
- The eyelid is made with black yarn, and lashes are embroidered with thin black thread.
- The nose is embroidered with pink cotton yarn in Rd 13 over a length of 3 sc.
- Eyebrows are embroidered with thin black thread slightly slanted at Rd 8 (6sc distance).
- Optionally, embroider pink cheeks under the eyes (2sc wide).
- Sew the ears on either side of the head, between Rd 3/4.
Body Assembly:
- Sew the arms directly under the head.
- Attach the fluffy bunny tail (or pompom) to the center back of the sweater.
- Sew the legs directly under the sweater.
- Optionally, sew a button onto the sweater.
All Finished!
Feel free to tag me (@freeamigurumii) in your photos on Instagram or Facebook if you’d like to share your creations!