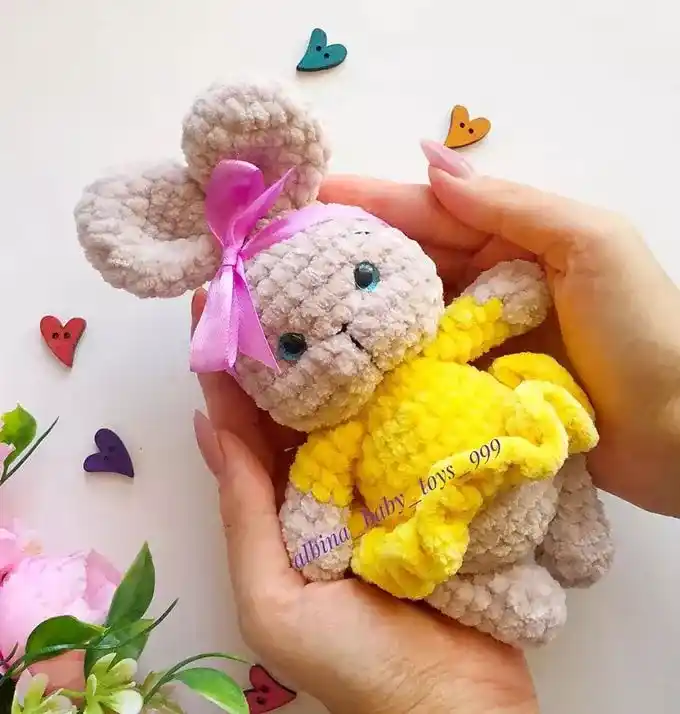
Free Crochet Master Class: Bunny Mica by @albina_babu_toys_999
In this tutorial, you will learn how to crochet a plush bunny in a dress using amigurumi techniques. The pattern is simple, and you can use any plush yarn for the project. The author recommends Himalaya Velvet yarn and a 3 mm crochet hook. All parts are crocheted separately and then sewn together. You can decorate the bunny with a satin ribbon for added charm.
Size of the finished toy: approximately 20 cm.
Materials and Tools
- Yarn:
- Himalaya Velvet: Two colors (one for the body and one for the dress)
- Embroidery thread for the muzzle
- Crochet Hook: 3 mm
- Toy Eyes: 10 mm
- Toy Filling
- Needle for attaching parts
- Scissors
Crochet Symbols
- KA = Magic Ring
- sc = Single crochet
- dc = Double crochet
- inc = Increase
- dec = Decrease
- (…) x n = Repeat n times
Crochet Pattern for Bunny Mica
Ears (2 parts)
- Round 1: 6 sc in KA
- Round 2: 6 inc (12)
- Round 3: 12 sc
- Round 4: 2 dec, 4 sc, 2 dec (8)
- Rounds 5-8: 8 sc
- Round 9: dec, 2 sc, dec, 2 sc (8)
Fold the piece and crochet it together.
Body
- Round 1: 6 sc in KA
- Round 2: 6 inc (12)
- Round 3: 1 sc, inc (18)
- Round 4: 2 sc, inc (24)
- Round 5: 3 sc, inc (30)
- Round 6: 6 sc, crochet around the leg, 12 sc, 3 sc around the leg, 6 sc (30)
- Round 7: 30 sc
- Round 8: Change color to the dress color
- Round 9: Crochet 30 sc in the back loops
10-11. Rounds 10-11: 30 sc - Round 12: 3 sc, dec (24)
- Round 13: 2 sc, dec (18)
- Round 14: 18 sc
- Round 15: 1 sc, dec (12)
Stuff the body and hide the yarn.
Skirt (Dress)
- In each stitch, crochet an inc
- In each stitch from the dc (double crochet), crochet an inc
Hide the yarn end.
Arms (2 parts)
- Round 1: 5 sc in KA (5)
- Round 2: 5 inc (10)
- Round 3: 10 sc
- Round 4: 2 dec, 6 sc (8)
- Round 5: 8 sc
- Change to the dress color
7-8. Rounds 7-8: 8 sc
Fold the arm and crochet 4 sc to join. Cut the yarn and hide the end.
Head
- Round 1: 6 sc in KA
- Round 2: 6 inc (12)
- Round 3: 1 sc, inc (18)
- Round 4: 2 sc, inc (24)
- Round 5: 3 sc, inc (30)
- Round 6: 4 sc, inc (36)
7-10. Rounds 7-10: 36 sc - Round 11: dec, 4 sc (30)
- Round 12: dec, 3 sc (24)
- Round 13: dec, 2 sc (18)
- Round 14: 1 sc, dec (12)
Insert the eyes between rounds 8 and 9, with a 5 sc gap between the eyes.
Ears (2 parts)
- Round 1: 6 sc in KA
- Round 2: 6 inc (12)
- Round 3: 1 sc, inc (18)
4-5. Rounds 4-5: 18 sc - Round 6: dec, 7 sc, dec, 7 sc (16)
- Round 7: dec, 6 sc, dec, 6 sc (14)
- Round 8: 1 sc, dec x 4, 2 sc (10)
- Round 9: 10 sc, crochet together
Tail
- Round 1: 4 sc in KA
- Round 2: 4 inc (8)
- Round 3: 8 sc
Cut the yarn, secure it, and lightly stuff the tail.
Assembling the Toy
- Attach the head to the body.
- Position the front legs closer to the body.
- Sew the ears to the top of the head.
- Create an indentation in the muzzle to give it a more defined shape.
- Attach the tail to rounds 5-6 of the body.
Now your cute Bunny Mica is ready! Enjoy creating this adorable plush toy with your own personal touch.