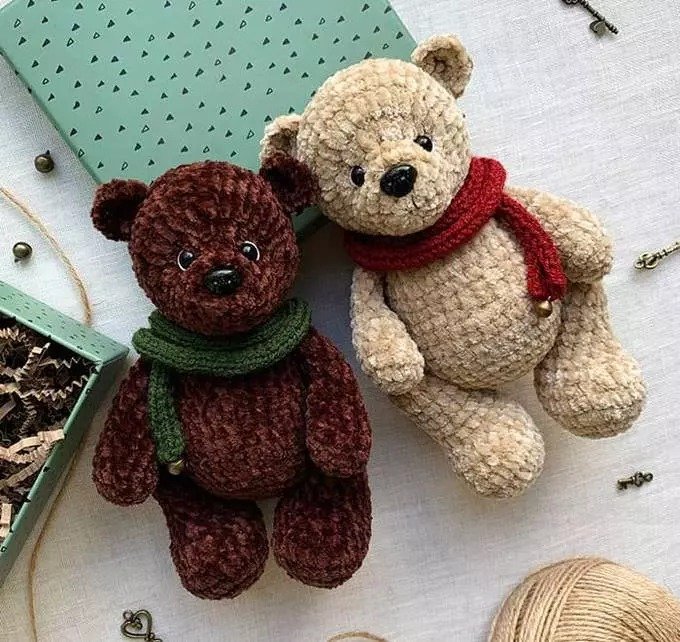
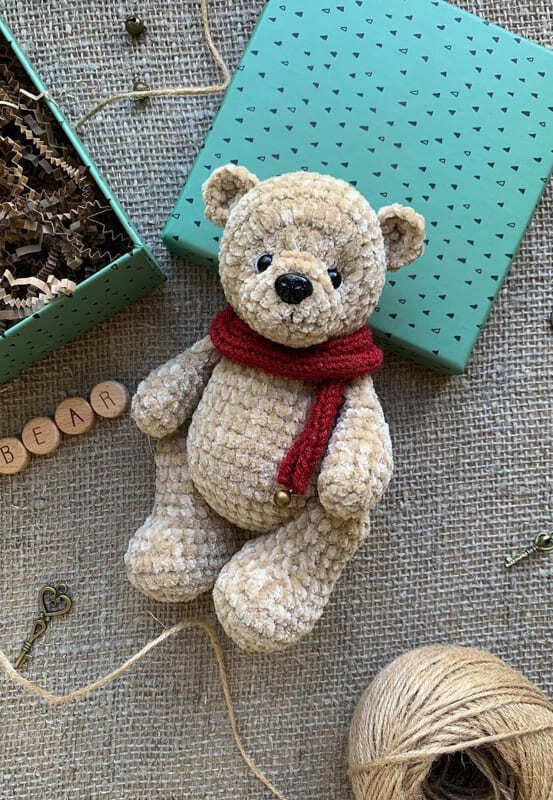
Free Crochet Master Class: Plush Teddy Bear by Evgenia Teplyakova (@jackie_toys)
This pattern allows you to crochet an adorable teddy bear using velour yarn and a crochet hook. You can use any plush yarn and a matching hook for amigurumi. Decorate your teddy bear with a satin ribbon or a crocheted scarf for a personal touch.
Finished Size: Approximately 17 cm.
Materials and Tools
- Plush yarn: YarnArt Velour (100 g / 170 m), color 852 (brown) or 843 (beige)
- Crochet hook: 3 mm
- Thin white yarn or embroidery floss
- Durable thread: Matching the yarn color
- Safety eyes: 6 mm
- Safety nose: 0.8–1.0 cm
- Plastic joints: 15–20 mm, 3 pieces
- Stuffing: Fiberfill or similar
- Needle
- Pins
- Stitch markers
- Scissors
Stitch Abbreviations
- MR: Magic ring
- ch: Chain
- sl st: Slip stitch
- sc: Single crochet
- hdc: Half double crochet
- inc: Increase
- dec: Decrease
- (…) x n: Repeat instructions in parentheses n times
Pattern Instructions
Legs (Make 2)
- Chain 4. Starting from the second chain from the hook: sc, sc, 3 sc in the last chain. Continue on the other side of the chain: sc, 2 sc in the last stitch (8).
- Inc, sc, 3 inc, sc, 2 inc (14).
- Inc, 3 sc, 4 inc, 3 sc, 3 inc (22).
- Inc, 5 sc, 2 inc, 2 sc, 2 inc, 5 sc, 2 inc, 2 sc, inc (30).
- 30 sc (30).
- 8 sc, 6 dec, 6 sc, 2 dec (22).
- 22 sc (22).
- 5 sc, 6 dec, 5 sc (16).
- 16 sc (16).
- (6 sc, dec) x 2 (14).
Stuff the leg lightly.
11-13. 14 sc (14). Continue stuffing the leg. - (5 sc, dec) x 2 (12).
Insert the joint between rows 12 and 13 at the center of the side that will attach to the body. - 6 dec (6).
Stuff the leg firmly. Fasten off and close the remaining hole.
Body
- Chain 2. In the second chain from the hook, crochet 6 sc (6).
- 6 inc (12).
- (1 sc, inc) x 6 (18).
- (2 sc, inc) x 6 (24).
- (3 sc, inc) x 6 (30).
- (4 sc, inc) x 6 (36).
7-11. 36 sc (36). - (4 sc, dec) x 6 (30).
- 30 sc (30).
Attach the legs using joints between rows 6 and 7. Secure the joints.
- (8 sc, dec) x 3 (27).
- 27 sc (27).
- (7 sc, dec) x 3 (24).
Begin stuffing the body. - 24 sc (24).
- (2 sc, dec) x 6 (18). Continue stuffing.
- (1 sc, dec) x 6 (12). Firmly stuff the upper body.
- 6 dec. Insert the joint and crochet around it, making decreases.
Head
- Chain 2. In the second chain from the hook, crochet 6 sc (6).
- 6 inc (12).
- (1 sc, inc) x 6 (18).
4-5. 18 sc (18). - 6 sc, 6 inc with hdc, 6 sc (24).
- sc, inc, sc, inc, sc, inc, (1 hdc, inc) x 6, sc, inc, sc, inc, sc, inc (36).
8-9. 36 sc (36).
At the end of row 9, make a hole for the neck joint: replace the last sc with 1 ch, skip the stitch, and continue in the next stitch.
10-12. 36 sc (36).
Insert the nose between rows 2 and 3. Place the eyes on row 6, spaced 2.5–3 cm apart.
- (4 sc, dec) x 6 (30).
- (3 sc, dec) x 6 (24).
Stuff the head and attach it to the body using the joint. Secure the joint.
- (2 sc, dec) x 6 (18). Continue stuffing.
- (1 sc, dec) x 6 (12).
- 6 dec.
Fasten off and close the hole.
Ears (Make 2)
- Chain 2. In the second chain from the hook, crochet 6 sc (6).
- 5 inc (10), sl st.
Fasten off, leaving a tail for sewing. Attach the ears between rows 10 and 11.
Arms (Make 2)
- Chain 2. In the second chain from the hook, crochet 6 sc (6).
- 6 inc (12).
- (3 sc, inc) x 3 (15).
- 5 sc, dec, 8 sc (14).
- (5 sc, dec) x 2 (12).
- 5 sc, dec, 5 sc (11).
- 4 sc, dec, 5 sc (10).
Lightly stuff the bottom of the arm. - 4 sc, dec, 4 sc (9).
9-11. 9 sc (9). - 3 sc, dec, 4 sc (8).
- 8 sc (8), sl st, ch 1.
Fasten off, leaving a tail. Sew the top edge closed and attach the arms to the sides of the body.
Tail
- Chain 2. In the second chain from the hook, crochet 6 sc (6).
- (1 sc, inc) x 3 (9).
- (1 sc, dec) x 3 (6), sl st.
Fasten off, leaving a tail for sewing. Attach the tail to the center of the back around row 5 or 6.