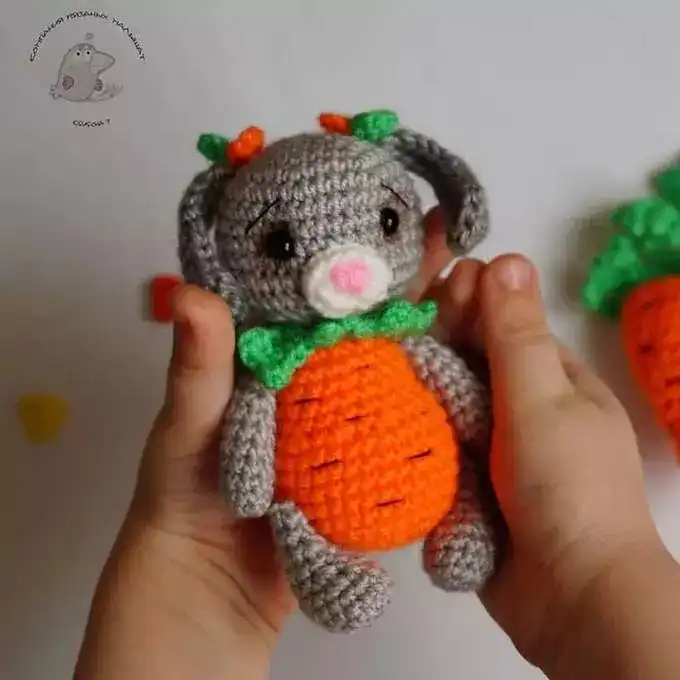
Free Crochet Masterclass: Mini Bunny by @bunnyanntoys
In this tutorial, you will learn how to crochet a little plush bunny using amigurumi techniques. The entire bunny is crocheted in spirals. You can add a ribbon to decorate your bunny and embroider the face using fine, smooth thread or floss.
The finished toy will be about 25 cm tall.
Materials & Tools
- Plush Yarn (any color)
- Smooth thread for embroidery (for the face)
- Crochet Hook: 3-4 mm
- Safety Eyes for the toy
- Toy Stuffing (polyester fiberfill)
- Ribbon
- Stitch Markers
- Needle for attaching parts
- Scissors
Abbreviations
- KA – Magic ring
- ch – Chain stitch
- sc – Single crochet
- inc – Increase
- dec – Decrease
- (…) x n – Repeat n times
Crochet Mini Bunny: Step-by-Step Instructions
Legs
- Round 1: 4 ch.
- Round 2: Inc in the 2nd ch from the hook, sc, 3 sc in the last ch, turn, 2 sc.
- Round 3: Inc, sc, inc, 6 sc.
- Round 4: Inc, sc, inc, sc, inc, 6 sc.
- Rounds 5-6: 14 sc (2 rounds).
- Round 7: Sc, 3 dec, 7 sc.
- Round 8: Sc, 1 dec from 3 sc, 6 sc.
- Rounds 9-12: 8 sc for 4 rounds.
Do not stuff completely. Crochet through both loops.
Arms
- Round 1: 6 sc in KA.
- Round 2: (1 sc, inc) x 3 (9).
- Rounds 3-4: 9 sc (2 rounds).
- Round 5: 1 sc, dec from sc (7).
- Rounds 6-9: 7 sc for 4 rounds.
Stuff the bottom of the arms. Crochet through both loops.
Ears
- Round 1: 7 sc in KA.
- Round 2: 7 inc (14).
- Round 3: (1 sc, inc) x 7 (21).
- Rounds 4-8: 21 sc for 5 rounds.
- Round 9: (1 sc, dec) x 7 (14).
- Rounds 10-11: 14 sc (2 rounds).
Attach the ears by folding them in half to form a crease down the middle.
Tail
- Round 1: 6 sc in KA.
- Round 2: (1 sc, inc) x 3 (9).
- Round 3: 9 sc.
Slightly stuff the tail and leave a long tail for sewing.
Body & Head (Crocheted in one piece)
Start with the body:
- Round 1: 7 sc in KA.
- Round 2: 7 inc (14).
- Round 3: (1 sc, 1 inc) x 7 (21).
- Round 4: 1 sc, 1 inc (2 sc, 1 inc) x 6, sc (28).
- Round 5: For the belly: (3 sc, inc) x 3, 16 sc (31).
- Rounds 6-10: 31 sc (5 rounds). In round 7, add the legs: 15 sc for the first leg, leaving 2 sc at the end of the round for the second leg, which continues into round 8.
- Round 11: 4 sc, dec, 2 sc, dec, 2 sc, dec, 15 sc (28).
- Round 12: (2 sc, 1 dec) x 7 (21).
- Rounds 13-14: 21 sc (2 rounds).
- Round 15: (1 sc, 1 dec) x 7 (14).
- Round 16: Attach arms: 3 sc for the first arm, 3 sc, 3 sc for the second arm, 2 sc, dec, sc (13).
- Round 17: 4 sc, dec, 6 sc (12).
- Round 18: 1 sc, inc, 3 sc, inc, 6 sc (14).
- Round 19: (1 sc, 1 inc) x 7 (21).
- Round 20: 1 sc, 1 inc, (2 sc, 1 inc) x 6, sc (28).
- Round 21: (3 sc, inc) x 7 (35).
- Rounds 22-25: 35 sc (4 rounds).
- Round 26: (3 sc, dec) x 7 (28).
- Round 27: 28 sc.
- Round 28: (2 sc, dec) x 7 (21).
- Round 29: (1 sc, dec) x 7 (14).
- Rounds 30-31: Continue decreasing until a small hole remains, then close with the yarn and needle.
Face Shaping and Nose
- To create the face indentation, secure the yarn at the base of the head and use the needle to pull the thread through the left corner of the eyes, then through the right and pull back down to the base. Tighten as needed. Repeat for the second eye until you achieve the desired result.
- Embroider the nose using dark yarn and make a smile and eyebrows. Secure the yarn at the neck base.
Finishing Touches
Once the bunny’s body is complete, assemble all the parts: attach the arms, legs, ears, and tail. Sew the ribbon to decorate the bunny if desired.
Your Mini Bunny is Ready!
Your adorable mini bunny is now finished! Don’t forget to share your work and tag the author on social media: @bunnyanntoys.