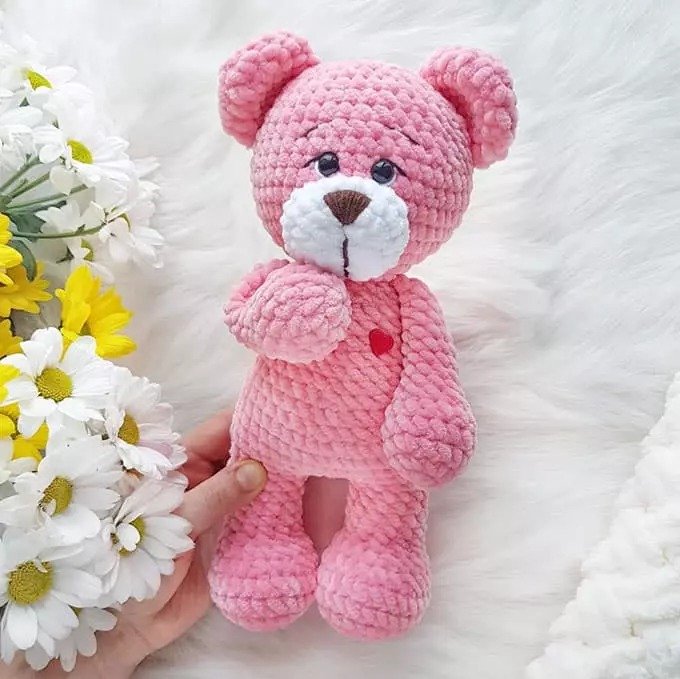
Free Crochet Teddy Bear Tutorial by Ekaterina Chirnova (@chirka_toys)
In this tutorial, you will learn how to crochet a plush teddy bear with a heart on its chest. This amigurumi project requires soft plush yarn, such as Himalaya Dolphin Baby. You can use a ready-made nose with a safe attachment or embroider one yourself. Optionally, you can add a head shaping technique and sew a cute heart-shaped button for decoration.
Materials & Tools
- Plush yarn, such as Himalaya Dolphin Baby (or any similar plush yarn)
- Yarn for embroidery (for face details)
- Crochet hook (3.5 mm)
- Safety eyes (10 mm)
- Toy stuffing
- Stitch markers
- Pins
- Heart-shaped decorative button
- Needle for attaching details
- Scissors
Crochet Abbreviations
- KA — Magic ring
- vp — Chain stitch
- ss — Slip stitch
- sc — Single crochet
- dc — Double crochet
- hdc — Half double crochet
- inc — Increase (2 sc in the same stitch)
- dec — Decrease (2 sc together)
- (…) x n — Repeat n times
Amigurumi Teddy Bear Crochet Instructions
Hands (2 parts)
- 6 sc in magic ring
- 6 inc (12)
- 3 sc, inc (15)
- 4-5. 15 sc (15)
- (1 sc, dec) x 5 (10)
- 7-14. 10 sc (10)
- (1 sc, dec) x 3, 1 sc (7)
- Stuff only the bottom part of the hand with filler. Fold it in half and crochet 3 sc. Cut the yarn and secure the end.
Tail
- 6 sc in magic ring
- 6 inc (12)
- 3 sc, inc (15)
- 15 sc (15)
- 7 dec, ss
- Leave a tail of yarn to attach the tail later.
Ears (2 parts)
- 6 sc in magic ring
- 6 inc (12)
- (1 sc, inc) x 6 (18)
- 4-5. 18 sc (18)
- (7 sc, dec) x 2 (16)
- Leave a tail of yarn to attach the ears later.
Face (Snout)
- Chain 5, crochet into the second chain from the hook: inc, 2 sc, 3 sc in the last chain, turn and crochet the remaining 3 sc (10)
- 2 inc, 2 sc, 3 inc, 2 sc, inc (16)
- (1 sc, inc) x 2, 2 sc, (1 sc, inc) x 3, 2 sc, 1 sc, inc (22)
- 22 sc (22)
- Leave a tail of yarn to attach the snout later.
Body, Legs & Head
The body and legs are crocheted as one piece.
- Chain 5, crochet into the second chain from the hook: 3 sc, 4 sc in the last chain, turn and crochet on the other side of the chain: 2 sc, 3 sc in the first chain (12)
- 1 sc, inc (18)
- inc, 2 sc (24)
- 4-5. 24 sc (24)
- 6 sc, dec, 2 sc, dec, 2 sc, dec, 8 sc (21)
- 4 sc, (dec, 1 sc) x 3, dec, 6 sc (17)
- 3 sc, 4 dec, 6 sc (13)
- 9-13. 13 sc (13)
- For the right leg, crochet 3 more sc, ss, cut the yarn.
- For the left leg, in the 13th row, do not crochet the last 3 sc. You will crochet only 10 sc, then chain 3 and continue, joining the right leg.
- Note: Everyone’s crochet tension is different, so you may need to adjust by adding or removing a few stitches in each leg to ensure they match. My teddy bear’s legs are slightly angled inward for a cute “wobbly” effect.
- 13 sc, inc, 1 sc, inc, 13 sc, inc, 1 sc, inc (36)
- (8 sc, inc) x 4 (40)
- 16-17. 40 sc (40)
- 7 sc, dec, 17 sc, dec, 12 sc (38)
- 13 sc, dec, 2 sc, inc, 13 sc, dec, 2 sc, inc (34)
- 34 sc (34)
- 6 sc, dec, 7 sc, inc, 6 sc, dec, 7 sc, inc (30)
- 22-24. 30 sc (30)
- (3 sc, dec) x 6 (24)
- 24 sc (24)
- (dec, 6 sc) x 3 (21)
- (5 sc, dec) x 3 (18)
- 18 sc, in this row, crochet the hands (distance between hands = 6 sc) (18)
- (1 sc, dec) x 6 (12)
- 12 inc (24) — Start crocheting the head now.
Head
- (3 sc, inc) x 6 (30)
- 2 sc, inc, (4 sc, inc) x 5, 2 sc (36)
- (5 sc, inc) x 6 (42)
- 3 sc, inc, (6 sc, inc) x 5, 3 sc (48)
- 36-38. 48 sc (48)
- (6 sc, dec) x 6 (42)
- (dec, 12 sc) x 3 (39)
- (dec, 11 sc) x 3 (36)
- (inc, 10 sc) x 3 (33)
- Insert the eyes between rows 38 and 39, spacing them 2 sc apart. Make sure the head is stuffed to properly determine the center for accurate placement of the eyes.
- (inc, 9 sc) x 3 (30)
- (3 sc, dec) x 6 (24)
- (2 sc, dec) x 6 (18)
- (1 sc, dec) x 6 (12)
- 6 dec (6)
- Cut the yarn, thread the end through a needle, and tighten the opening to close it.
Assembling the Teddy Bear
- Attach the snout directly below the eyes. Stuff it with filler to give it a nice shape.
- Insert the nose if you have a safety attachment. If not, embroider a nose using brown yarn (YarnArt Jeans).
- Use the same brown yarn to embroider the eyebrows.
- Embroider the mouth if desired, and make a slight head shaping by pulling the yarn from the bottom to the top of the snout for a more defined look.
- With black yarn (YarnArt Jeans), embroider eyelids directly above the eyes, and use white yarn to create small stitches from the center of the eye down to make them more expressive.
- Sew on a decorative heart-shaped button for added charm.
Your Crochet Teddy Bear is Ready!
Congratulations, your crochet teddy bear is now complete! Feel free to share your creation with the author on social media: @chirka_toys.