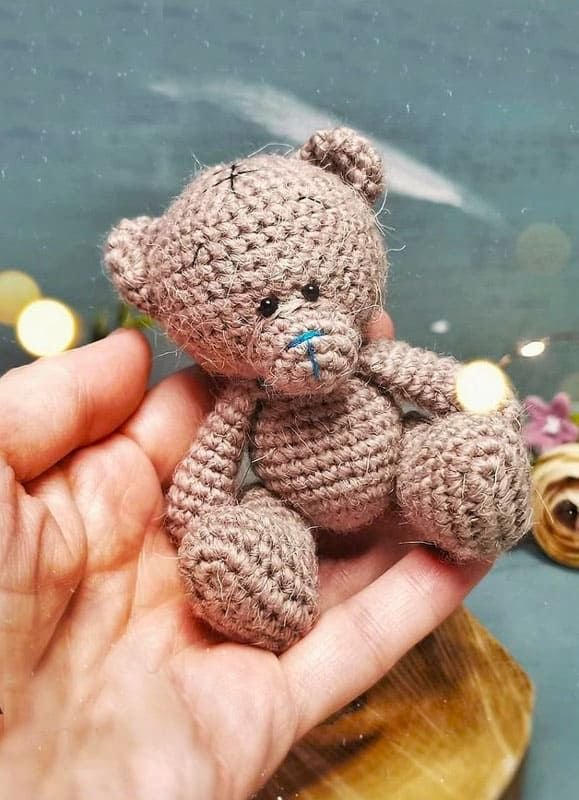
Teddy Bear Keychain Amigurumi – Free Pattern
Hello dear friends! Recently, I started to share more keychain amigurumi patterns. These little crochet keychains are especially popular among women who love crochet art. It can sometimes be difficult to find such small amigurumi patterns, but I’ve got you covered with this adorable teddy bear keychain pattern. Depending on the quality of the yarn you use, the shape of the toy may change, but the result will still be cute!
Animal amigurumi is one of the most popular categories, and keychain animals are a favorite due to their small size and charm. This teddy bear keychain is small, but the pattern includes all the details, explained step by step. There’s also a video tutorial that you can watch to help guide you through the process. Now, let’s crochet the keychain teddy bear amigurumi step by step!
Designer
Instagram: keti_amigurumi
Abbreviations
- MR: Magic Ring
- sc: Single Crochet
- inc: Increase
- dec: Decrease
- trc: Triple Crochet/Treble Crochet
- st: Stitch
- dc: Double Crochet
- hdc: Half Double Crochet
- sl-st: Slip Stitch
- ch: Chain
- ..in: Make increase into the same stitch (e.g., 3inc, 4inc)
- FLO: Crochet into front loops only
- BLO: Crochet into back loops only
Head
- Rnd 1: 6 sc in MR
- Rnd 2: 12 inc
- Rnd 3: (1 sc + inc) * 6 (18 sc)
- Rnd 4: (2 sc + inc) * 6 (24 sc)
- Rnd 5: (3 sc + inc) * 6 (30 sc)
- Rnd 6: (4 sc + inc) * 6 (36 sc)
- Rnd 7-14: No change (36 sc)
- Rnd 15: (4 sc + dec) * 6 (30 sc)
- Rnd 16: (3 sc + dec) * 6 (24 sc)
- Rnd 17: (2 sc + dec) * 6 (18 sc)
- Rnd 18: (1 sc + dec) * 3 (15 sc)
Ears (Make 2)
- Rnd 1: 6 sc in MR
- Rnd 2: 12 inc
- Rnd 3: No change (12 sc)
Crochet 2 sides, leave a section for sewing.
Muzzle
- Rnd 1: 5 sc in MR
- Rnd 2: 10 inc
- Rnd 3: (1 sc + inc) * 5 (15 sc)
- Rnd 4-5: No change
Leave a section for sewing. Fill the muzzle with holofiber.
Arms (Make 2)
- Rnd 1: 5 sc in MR
- Rnd 2: 10 inc
- Rnd 3-4: No change (10 sc)
- Rnd 5: Dec, 8 sc (9 sc)
- Rnd 6-11: No change (9 sc)
Fill the arms halfway with holofiber. Crochet 2 sides and leave a section for sewing.
Body
- Rnd 1: 6 sc in MR
- Rnd 2: 12 inc
- Rnd 3: (1 sc + inc) * 6 (18 sc)
- Rnd 4: (2 sc + inc) * 6 (24 sc)
- Rnd 5: (3 sc + inc) * 6 (30 sc)
- Rnd 6-8: No change (30 sc)
- Rnd 9: (3 sc + dec) * 6 (24 sc)
- Rnd 10-11: No change (24 sc)
- Rnd 12: (2 sc + dec) * 6 (18 sc)
- Rnd 13: No change (18 sc)
- Rnd 14: (1 sc + dec) * 3 (15 sc)
Fill the body well and leave a section for sewing to the head.
Legs (Make 2)
Start by chaining 7 ch. Crochet in the opposite direction (crochet in 6th loop).
- Rnd 1: inc, 4 sc, 4 inc (in one loop, turn around and crochet in the other direction), 4 sc, inc (16 sc)
- Rnd 2: 2 inc, 4 sc, 4 inc, 4 sc (22 sc)
- Rnd 3-5: No change (22 sc)
- Rnd 6: 10 sc, 4 dec (in a row), 4 sc (18 sc)
- Rnd 7: 9 sc, 3 dec (in a row), 3 sc (15 sc)
- Rnd 8: 8 sc, 2 dec (in a row), 2 sc (13 sc)
- Rnd 9-12: No change
- Rnd 13: 6 dec, 7 sc (7 sc)
At this stage, fill the legs. Tighten the loops and fasten the yarn.
Final Assembly
Now that all parts are ready, sew them together:
- Sew the ears and muzzle onto the head.
- Attach the arms to the body.
- Sew the body to the head.
- Finally, attach the legs to the body and your teddy bear keychain is ready!
Congratulations!
You have completed your cute teddy bear keychain amigurumi! Enjoy your little handmade creation!