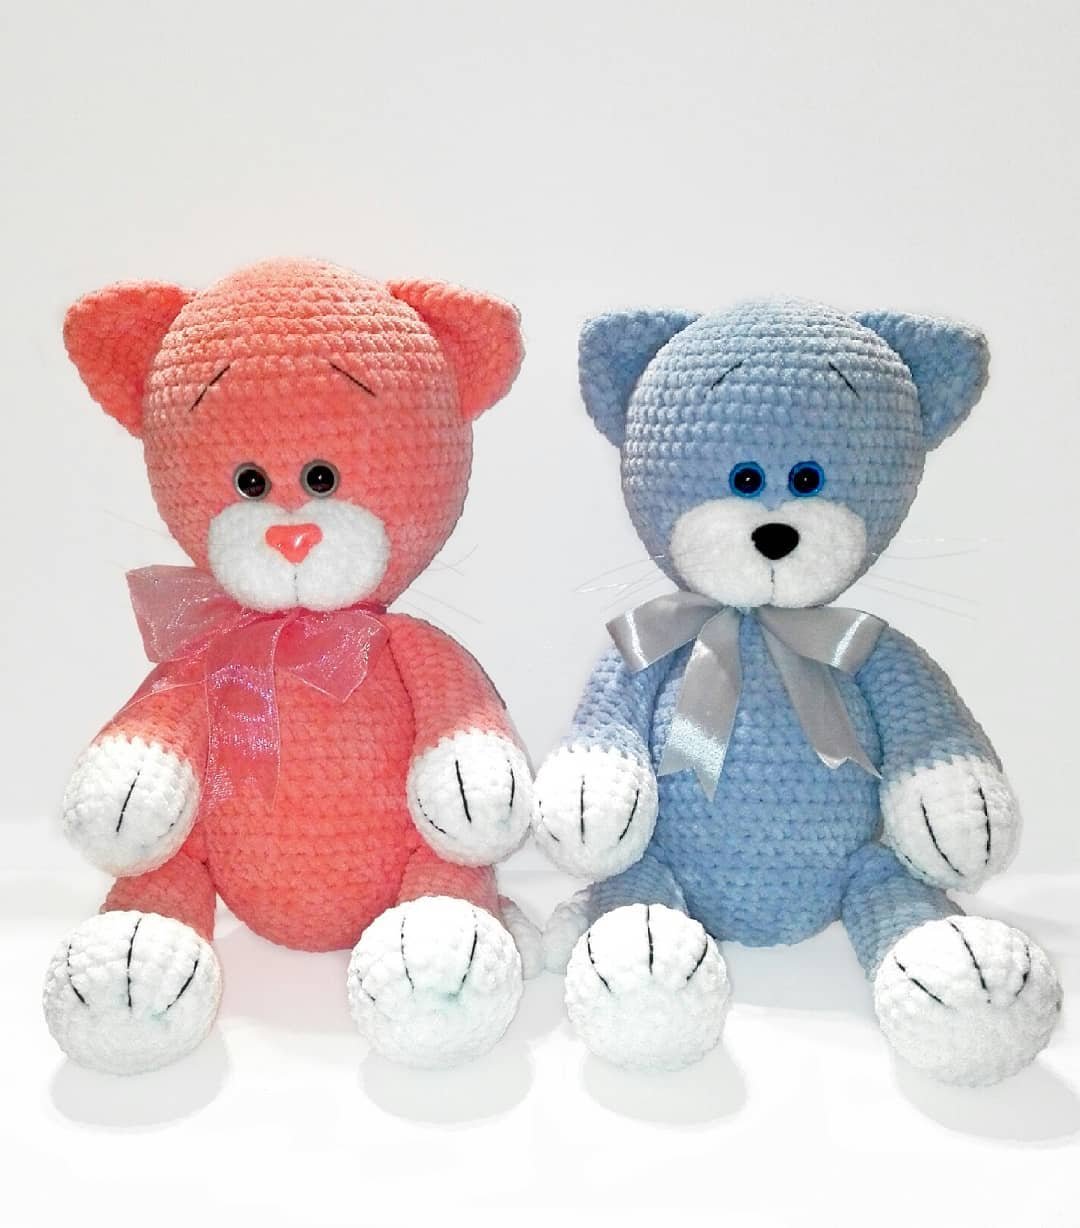
Free Crochet Large Plush Cat Amigurumi Pattern
Introduction
This large plush cat, standing at approximately 40 cm (15.7 inches), is perfect for snuggling! It’s crocheted using Himalaya Dolphin Baby yarn for a soft and cuddly finish. This pattern is a fun project that combines different yarn types and crochet techniques to create a truly lovable toy.
Materials:
- Yarn:
- Himalaya Dolphin Baby yarn (1.5 skeins for the main color, a little white for details)
- Alize Softy yarn for the muzzle (white)
- YarnArt Jeans yarn (main color for sewing and black for embroidering)
- Hook Sizes:
- 3.5 mm (for Alize Softy yarn)
- 4-4.5 mm (for Himalaya Dolphin Baby yarn)
- Other Materials:
- 20 mm safety eyes
- 24×16 mm plastic safety nose
- Fishing line for whiskers
- Satin ribbon for a bow
- Fiberfill
- Stitch marker
- Yarn needle and scissors
Abbreviations:
- R = Row
- mc = Magic Circle
- sc = Single Crochet
- inc = 2 sc in the next stitch
- dec = Single crochet 2 stitches together
- F.o. = Finish Off
- (12) = Number of stitches at the end of the round/row
- ( ) * 6 = Repeat the instructions inside the parentheses 6 times
Crochet Large Plush Cat Free Amigurumi Pattern
Arms (Make 2)
- With white color:
- R 1: 5 sc in mc (5)
- R 2: inc*5 (10)
- R 3: (1 sc, inc)*5 (15)
- R 4: (2 sc, inc)*5 (20)
- R 5-8: 20 sc (4 rows)
- With main color:
- R 9: 20 sc
- R 10: 7 sc, 3 dec, 7 sc (17)
- R 11: 6 sc, 3 dec, 5 sc (14)
- R 12-22: 14 sc (11 rows)
- Stuff until R 19 with fiberfill.
- Finish the arm:
- Fold the top flat and crochet 3 sc through both sides across.
- F.o.
Legs (Make 2)
- With white color:
- R 1: 6 sc in mc (6)
- R 2: inc*6 (12)
- R 3: (1 sc, inc)*6 (18)
- R 4: (2 sc, inc)*6 (24)
- R 5-8: 24 sc (4 rows)
- With main color:
- R 9: 4 sc, 5 dec, 6 sc, dec, 2 sc (18)
- R 10-12: 18 sc (3 rows)
- R 13: 4 sc, 2 dec, 10 sc (16)
- R 14-24: 16 sc (11 rows)
- Stuff until R 21 with fiberfill.
- Finish the leg:
- Fold the top flat and crochet 8 sc through both sides across.
- F.o.
Head and Body (One Piece)
- R 1: 6 sc in mc (6)
- R 2: inc*6 (12)
- R 3: (1 sc, inc)*6 (18)
- R 4: (2 sc, inc)*6 (24)
- R 5: (3 sc, inc)*6 (30)
- R 6: (4 sc, inc)*6 (36)
- R 7: (5 sc, inc)*6 (42)
- R 8: (6 sc, inc)*6 (48)
- R 9: (7 sc, inc)*6 (54)
- R 10: (8 sc, inc)*6 (60)
- R 11-18: 60 sc (8 rows)
- R 19: (8 sc, dec)*6 (54)
- R 20: (7 sc, dec)*6 (48)
- R 21: (6 sc, dec)*6 (42)
- R 22: (5 sc, dec)*6 (36)
- R 23: (4 sc, dec)*6 (30)
- R 24: (3 sc, dec)*6 (24)
- R 25: (2 sc, dec)*6 (18)
- R 26: (1 sc, dec)*6 (12)
Insert Safety Eyes:
Place safety eyes between R 15 and R 16, on the opposite side from the marker.
Crochet the Body:
- R 27: inc*12 (24)
Join arms or sew them later.
- R 28: 24 sc
- R 29: (3 sc, inc)*6 (30)
- R 30-32: 30 sc (3 rows)
- R 33: 13 sc, 6 inc, 11 sc (36) (6 inc for the belly, centered)
- R 34: (5 sc, inc)*6 (42)
- R 35: 42 sc
- R 36: (6 sc, inc)*6 (48)
- R 37: (7 sc, inc)*6 (54)
- R 38-41: 54 sc (4 rows)
- R 42: (7 sc, dec)*6 (48)
- R 43: (6 sc, dec)*6 (42)
Join legs or sew them later.
- R 44: (5 sc, dec)*6 (36)
- R 45: 36 sc
- R 46: (4 sc, dec)*6 (30)
- R 47: (3 sc, dec)*6 (24)
- R 48: 24 sc
- R 49: (2 sc, dec)*6 (18)
- R 50: (1 sc, dec)*6 (12)
- R 51: 12 sc
- R 52: dec*6 (6)
- F.o.
Ears (Make 2)
- R 1: 6 sc in mc (6)
- R 2: inc*6 (12)
- R 3: (1 sc, inc)*6 (18)
- R 4: (2 sc, inc)*6 (24)
- R 5-7: 24 sc (3 rows)
- Do not stuff.
- F.o.
Tail
- With white color:
- R 1: 6 sc in mc (6)
- R 2: (1 sc, inc)*3 (9)
- R 3-6: 9 sc (4 rows)
- With main color:
- R 7-17: 9 sc (11 rows)
- F.o.
Muzzle
- With Alize Softy yarn in two threads and a 3.5 mm hook:
- R 1: 6 sc in mc (6)
- R 2: inc*6 (12)
- R 3: (1 sc, inc)*6 (18)
- R 4: (2 sc, inc)*6 (24)
- R 5: (3 sc, inc)*6 (30)
- R 6: (4 sc, inc)*6 (36)
- R 7: (5 sc, inc)*6 (42)
- R 8: (6 sc, inc)*6 (48)
- R 9: 48 sc
- F.o. Leave a tail for sewing.
- Insert a safety nose.
Assembly
- Sew the tail to the body at R 44.
- Attach the ears to the head.
- Sew the muzzle onto the head under R 7, stuffing it lightly before closing.
- Embroider the line under the nose, the eyebrows, and paws with black YarnArt Jeans yarn.
- Insert whiskers.