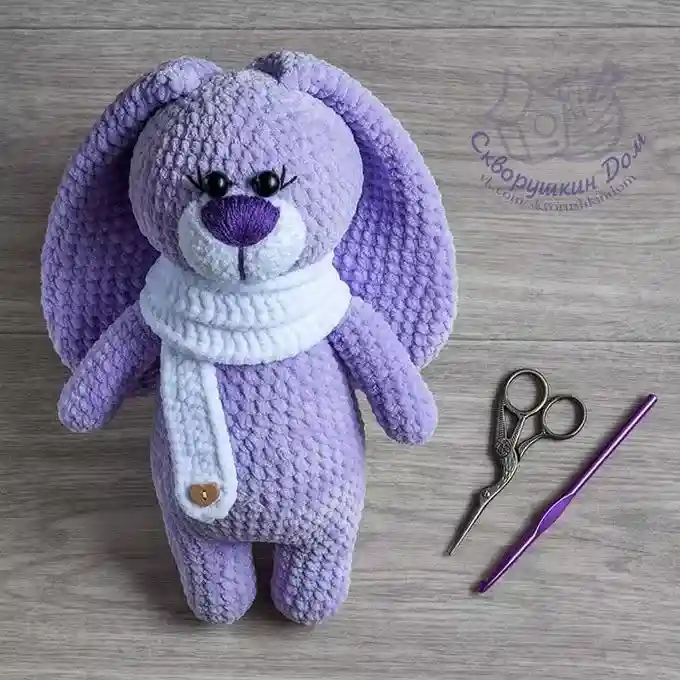
Free Crochet Masterclass: Lavender Bunny by Anna Skvortsova
In this masterclass, you will learn how to crochet a cute plush bunny wearing a scarf. This amigurumi project works well with any plush yarn, such as YarnArt Dolce, Himalaya Dolphin Baby, or Kamtex Velour. You will need about 1 skein of YarnArt Dolce for the bunny. The finished toy will be approximately 23 cm tall.
Materials and Tools
- Plush yarn YarnArt Dolce (for the bunny)
- Yarn Alize Baby Soft (for the muzzle and tail)
- Yarn YarnArt Jeans (for embroidering the nose)
- Crochet hook 5.5–5 mm
- Safety eyes for the toy
- Stuffing for the toy
- Needle for attaching parts
- Scissors
Abbreviations
- KA — Magic ring
- v.p. — Chain stitch
- ss — Slip stitch
- sc — Single crochet
- dec — Decrease
- inc — Increase
- (…) x n — Repeat n times
Crochet Pattern for the Lavender Bunny
Ears (2 Parts)
Using a 5.5 mm crochet hook:
- Round 1: Ch 2, 6 sc in the second chain from the hook (or 6 sc in a magic ring)
- Round 2: (1 sc, inc) x 3 (9)
- Round 3: (2 sc, inc) x 3 (12)
- Round 4: (3 sc, inc) x 3 (15)
- Round 5: (4 sc, inc) x 3 (18)
- Round 6: (5 sc, inc) x 3 (21)
7-9. Rounds 7-9: 21 sc (3 rounds) - Round 10: (5 sc, dec) x 3 (18)
9-10. Rounds 11-12: 18 sc (2 rounds) - Round 13: (4 sc, dec) x 3 (15)
12-13. Rounds 14-15: 15 sc (2 rounds) - Round 16: (3 sc, dec) x 3 (12)
15-16. Rounds 17-18: 12 sc (2 rounds) - Round 19: (2 sc, dec) x 3 (9)
18-20. Rounds 20-22: 9 sc (3 rounds) - Round 23: (1 sc, dec) x 3 (6)
Join the two sides of the ear with 3 sc, cut the yarn, secure the end, and hide it inside.
Front Paws (2 Parts)
Using a 5 mm crochet hook:
- Round 1: Ch 2, 6 sc in the second chain from the hook (or 6 sc in a magic ring)
- Round 2: (inc, 1 sc, inc) x 2 (10)
3-9. Rounds 3-9: 10 sc (7 rounds) - Round 10: (dec, 1 sc, dec) x 2 (6). Optionally, add some stuffing to the paw. Join the two sides of the paw with 3 sc, cut the yarn, secure the end, and hide it inside.
Body and Head
The front paws and ears are attached during the crochet process. Use a 5 mm crochet hook. Start with the left front paw:
- Round 1: Ch 2, 6 sc in the second chain from the hook (or 6 sc in a magic ring)
- Round 2: 6 inc (12)
3-6. Rounds 3-6: 12 sc (4 rounds). Sl st, cut the yarn, and secure the end.
Crochet the right front paw similarly, then join them:
- Round 7: Ch 1; 12 sc along the left paw; make a sc in the first sc of the left paw; 1 sc in the ch; 12 sc along the right paw; make a sc in the first sc of the right paw (28 stitches). Mark the beginning of the round here.
8-13. Rounds 8-13: 28 sc (6 rounds) - Round 14: 5 sc, (dec, 5 sc, dec) x 2, 5 sc (24)
- Round 15: 24 sc
- Round 16: (6 sc, dec) x 3 (21)
- Round 17: 21 sc
- Round 18: (5 sc, dec) x 3 (18)
- Round 19: (1 sc, dec) x 6 (12)
- Round 20: Attach the front paws: 3 sc; 3 sc, catching the paw; 3 sc; 3 sc, catching the second paw.
- Round 21: (1 sc, inc) x 6 (18)
- Round 22: (2 sc, inc) x 6 (24)
- Round 23: (3 sc, inc) x 6 (30)
19-23. Rounds 24-28: 30 sc (5 rounds) - Round 29: (3 sc, dec) x 6 (24)
- Round 30: (2 sc, dec) x 6 (18)
- Round 31: (1 sc, dec) x 5, 1 sc; attach the ears: dec, catching the ear; dec – sc (with the ear); sc – dec (without the ear); dec, catching the ear; 5 dec, close the opening, cut the yarn, and secure the end.
Muzzle
Use 2 strands of yarn and a 5 mm crochet hook:
- Round 1: Ch 2, 6 sc in the second chain from the hook (or 6 sc in a magic ring)
- Round 2: 6 inc (12)
- Round 3: (1 sc, inc) x 6 (18)
- Round 4: 18 sc, leave a long tail for sewing, and secure the yarn.
Tail
Use 2 strands of yarn and a 5 mm crochet hook:
- Round 1: Ch 2, 6 sc in the second chain from the hook (or 6 sc in a magic ring)
- Round 2: 6 inc (12)
- Round 3: 6 dec (6), leave a long tail for sewing, and secure the yarn.
Assembly and Finishing
- Attach the muzzle and tail.
- Embroider the nose with a large needle.
- Attach the safety eyes. Optionally, embroider whiskers with the same yarn used for the nose.
- Add a scarf or ribbon around the bunny’s neck.