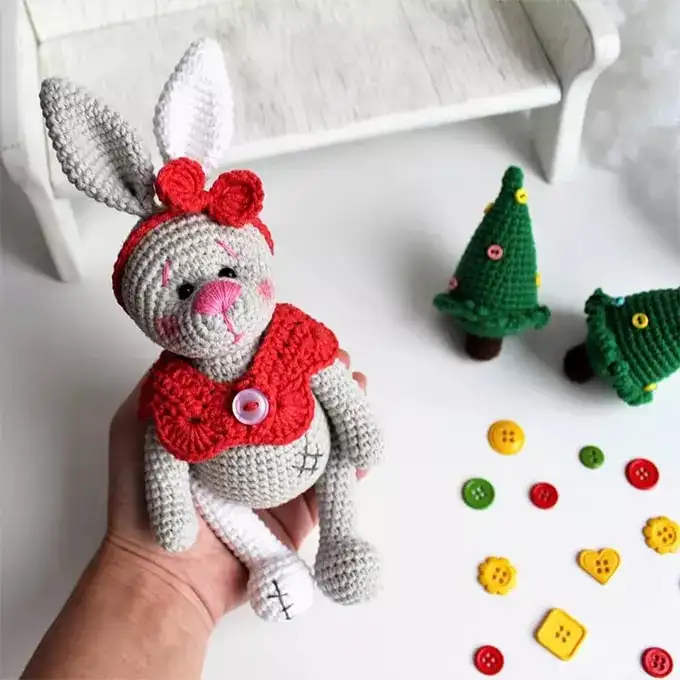
Free Crochet Masterclass: Bunny with Button Joint by Kateryna Arkhipova
In this tutorial, you will learn how to crochet a bunny with movable paws using the button-joint technique. This method allows the paws to be articulated, adding an extra dimension of movement to the toy. For this amigurumi project, any cotton yarn will work, such as YarnArt Jeans, Alize Cotton Gold, Gazzal Baby Cotton, or similar types. The paws are attached using buttons and strong thread, allowing them to move.
Finished Toy Size:
- Approx. 29 cm (11.4 inches) tall.
- If using YarnArt Jeans Plus, the size will be around 42 cm (16.5 inches).
Materials & Tools
- Yarn:
- YarnArt Jeans (light gray, white)
- Vita Cotton (pink, red)
- Other:
- Sewing thread
- Crochet hook (1.5-2 mm)
- Safety eyes (4-5 mm)
- Toy filler
- 4 buttons
- Dry pastels or blush for shading
- Needle for attaching parts
- Scissors
All materials can be purchased from craft stores or online.
Abbreviations
KA – Magic ring
ch – Chain stitch
ss – Slip stitch
sc – Single crochet
dc – Double crochet
ss2n – Double crochet with two yarn overs
pccn – Half double crochet
pr – Increase
yb – Decrease
(…) x n – Repeat n times
Crochet Instructions for Bunny with Button Joint
Head
- Round 1: Ch 2, 6 sc in the second ch from hook.
- Round 2: 6 increases (12).
- Round 3: (1 sc, inc) x 6 (18).
- Round 4: Work straight.
- Round 5: (2 sc, inc) x 6 (24).
- Round 6: Work straight.
Shaping the head from the snout:
- 6 sc, 6 increases through 1 sc, after the last increase, crochet 7 sc (30).
- 7 sc, 6 increases through 2 sc, after the last increase, crochet 7 sc (36).
- 8 sc, 6 increases through 3 sc, after the last increase, crochet 7 sc (42).
- 9 sc, 6 increases through 4 sc, after the last increase, crochet 7 sc (48).
11-19. Work straight, 48 sc in each row for 9 rows.
Embroider the nose with Vita Coco yarn. Start closing the head.
- (6 sc, dec) x 6 (42).
- (5 sc, dec) x 6 (36).
22-25. (4 rows) dec 6 times in each row (12). Stuff the head with synthetic filler. - 6 dec in a row (6).
Close off by cutting the yarn, leaving about 15 cm. Pull the yarn through the last stitches, secure it with a knot, and bury the ends inside the head.
Eyes:
Make a small indentation for the eyes, attaching them securely with strong thread (between rounds 6 and 7 of the head). Use a needle to pull the thread through the neck and stitch the eyes into place.
Ears (2 parts)
One ear is white, the other is gray.
- Round 1: Ch 2, 6 sc in the second ch from hook.
- Round 2: (inc, 2 sc, inc, 2 sc) (8).
- Round 3: 1 sc, inc, 3 sc, inc, 2 sc (10).
- Round 4: 2 sc, inc, 4 sc, inc, 2 sc (12).
- Round 5: 3 sc, inc, 5 sc, inc, 2 sc (14).
- Round 6: 4 sc, inc, 6 sc, inc, 2 sc (16).
- Round 7: 5 sc, inc, 7 sc, inc, 2 sc (18).
- Round 8: 6 sc, inc, 8 sc, inc, 2 sc (20).
- Round 9: 7 sc, inc, 9 sc, inc, 2 sc (22).
10-12. Work straight for 3 rows. - 8 sc, dec, 9 sc, dec, 1 sc (20).
- Work straight.
- 8 sc, dec, 8 sc, dec (18).
- Work straight.
- 8 sc, dec, 7 sc, dec (16). (You may end up on a different row here, but don’t worry!)
- Work straight.
Fold the ear in half and sew the bottom with 4 sc stitches. Watch the video tutorial for visual instructions!
Repeat for the second ear and attach both ears to the top of the head, sewing them twice for extra security.
Body
- Round 1: Ch 2, 6 sc in the second ch from hook.
- Round 2: 6 increases (12).
- Round 3: (1 sc, inc) x 6 (18).
- Round 4: 2 sc, inc, 2 sc, inc, 5 sc, inc, 2 sc, inc, 3 sc (22).
5-6. Work straight for 2 rows. - 10 sc, inc, 10 sc, inc (24).
- (3 sc, inc) x 6 (30).
Attach the neck to the head.
- Work straight, 30 sc.
- (4 sc, inc) x 6 (36).
- Work straight.
- Work straight.
Increase 3 times in the belly area, then proceed to the lower body as follows:
- 3 increases through 1 sc (do this by eye as necks may vary).
- 3 increases through 2 sc.
- 3 increases through 3 sc.
Work straight on the belly, increasing at the bottom.
- 3 increases through 1 sc, repeat for the bottom.
- 3 increases through 2 sc (51).
18-24. Work straight for 7 rows (51 sc per row).
Start closing the body:
- (6 sc, dec, 7 sc, dec) x 3 (45).
- (5 sc, dec, 6 sc, dec) x 3 (39).
- (4 sc, dec, 5 sc, dec) x 3 (33).
- (3 sc, dec, 4 sc, inc) x 3 (27).
- (2 sc, dec, 3 sc, inc) x 3 (21).
- (1 sc, dec, 2 sc, inc) x 3 (15).
Stuff the body firmly with synthetic filler.
- (dec, 1 sc, dec) x 3 (9).
- Close off.
Tail
- Round 1: Ch 2, 6 sc in the second ch from hook.
- Round 2: 6 increases (12).
- Round 3: 1 sc, inc, 5 sc, inc, 4 sc (14).
- Work straight. Cut the yarn and leave a long end. Attach the tail to the body, stuffing it with synthetic filler. Secure the tail by sewing it twice.
Arms (2 parts)
- Round 1: Ch 2, 6 sc in the second ch from hook.
- Round 2: 6 increases (12).
- Round 3: 1 sc, inc, 10 sc (13).
4-8. Work straight for 5 rows. - Begin the bend: inc, 5 sc, dec, 5 sc.
- 1 sc, inc, 5 sc, dec, 4 sc.
- 2 sc, inc, 5 sc, dec, 3 sc.
- 2 sc, inc, 5 sc, dec, 3 sc.
- 3 sc, inc, 5 sc, dec, 2 sc.
- 4 sc, inc, 5 sc, dec, 1 sc.
- 4 sc, inc, 5 sc, dec, 1 sc.
- 5 sc, inc, 5 sc, dec.
- 6 sc, inc, 5 sc, dec.
- 5 sc, inc, 5 sc, dec.
- 6 sc, inc, 5 sc, dec.
Fill the arm halfway with synthetic filler and insert the button joint.
Close the arm, leaving enough space for button attachment.
Legs (2 parts)
- Round 1: Ch 5, 3 sc, 5 sc in one st, 2 sc, 4 sc (14).
- Work straight, continuing for 3 rows.
3
. (Increase through the front loop of each sc) increasing on rows 10, increasing through each row.
Finishing Steps:
Finally, attach the movable arms using buttons with thread, securing them with knots and weaving through the entire length of the arm!
Happy Crocheting!


