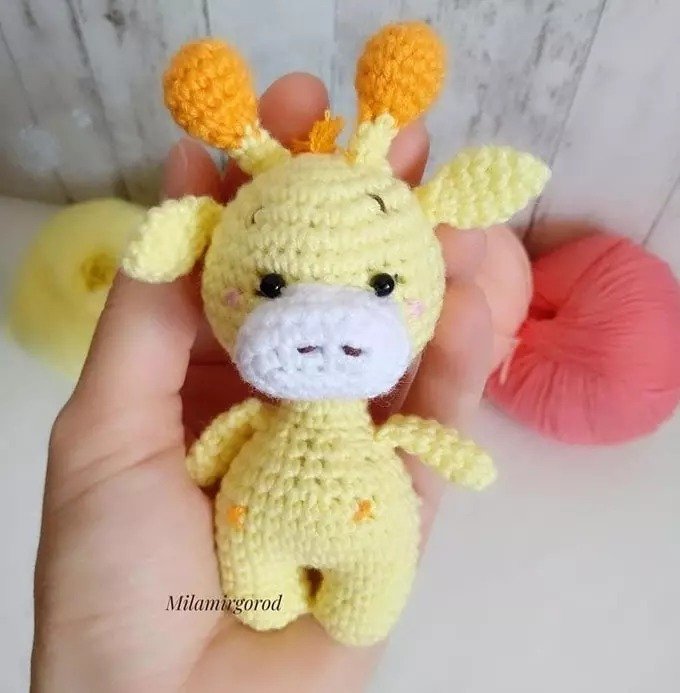
Free Crochet Masterclass: Little Giraffe by Milamіrgorod
In this tutorial, you’ll learn how to crochet a cute little giraffe. The pattern is perfect for beginners and uses basic amigurumi techniques. You can use any type of yarn, such as acrylic, cotton, or blended yarn. All parts of the giraffe are crocheted in spirals. The legs and body are crocheted as a single piece, while the arms, head, ears, horns, and snout are made separately and sewn together. Optional spots on the giraffe’s body can be added with embroidery or coloring. The nose, cheeks, and eyebrows are embroidered with fine thread.
Materials and Tools
- Yarn: Yellow, orange, white
- Embroidery thread (for snout details)
- Crochet hook (appropriate size for your yarn)
- Safety eyes
- Stuffing (for the body and head)
- Stitch markers
- Pins (for attaching parts)
- Needle (for sewing parts together)
- Scissors
Abbreviations
- KA — Magic ring (adjustable ring)
- ch — Chain stitch
- sc — Single crochet
- inc — Increase (2 sc in 1 stitch)
- dec — Decrease (2 sc together)
- (…) x n — Repeat n times
Crocheting the Legs and Body
- Start the first leg:
- Make 6 sc in a magic ring (KA).
- Round 2: Increase in each stitch (6 inc) (12 stitches).
- Rounds 3-5: 12 sc for 3 rounds (12 stitches). Do not cut the yarn, as you will continue working on the second leg.
- Crochet the second leg:
- Repeat the same steps for the second leg.
- After completing the second leg, join the legs with a chain of 3 ch.
- Crochet the body:
- Continue working in a circle, starting with 12 sc on one leg, 3 sc on the chain, and 3 sc on the other leg (30 stitches).
- Rounds 7-11: Crochet 30 sc for 5 rounds.
- Round 12: (3 sc, dec) x 6 (24 stitches).
- Round 13: (2 sc, dec) x 6 (18 stitches).
- Round 14: (1 sc, dec) x 6 (12 stitches).
- Rounds 15-18: Crochet 12 sc for 4 rounds.
Cut the yarn, leaving a long tail for sewing the body to the head.
Crocheting the Head
- Make 6 sc in a magic ring (KA).
- Round 2: Increase in each stitch (6 inc) (12 stitches).
- Round 3: (1 sc, inc) x 6 (18 stitches).
- Round 4: (2 sc, inc) x 6 (24 stitches).
- Round 5: (3 sc, inc) x 6 (30 stitches).
- Round 6: (4 sc, inc) x 6 (36 stitches).
- Rounds 7-12: Crochet 36 sc for 6 rounds.
- Round 13: (4 sc, dec) x 6 (30 stitches).
- Round 14: (3 sc, dec) x 6 (24 stitches).
- Round 15: (2 sc, dec) x 6 (18 stitches).
- Round 16: (1 sc, dec) x 6 (12 stitches).
- Round 17: 6 dec, pull the yarn tight to close.
Cut the yarn, leaving a long tail for sewing.
Crocheting the Snout
- Chain 5: Starting from the second chain from the hook, crochet 3 sc, 3 sc in the last chain, crochet 2 sc on the other side of the chain, and join with an increase (inc).
- Round 2: (inc, 2 sc, 3 sc, 2 sc, 2 inc) (16 stitches).
- Rounds 3-4: Crochet 16 sc for 2 rounds.
Crocheting the Arms
- Make 6 sc in a magic ring (KA).
- Rounds 2-6: Crochet 6 sc for 5 rounds.
- Fold the arm in half and crochet through both loops.
Crocheting the Horns (using orange yarn)
- Make 6 sc in a magic ring (KA).
- Round 2: 6 inc (12 stitches).
- Rounds 3-5: Crochet 12 sc for 3 rounds.
- Round 6: 6 dec.
- Change yarn to yellow.
- Rounds 7-9: Crochet 6 sc for 3 rounds.
Crocheting the Ears
- Make 4 sc in a magic ring (KA).
- Round 2: (1 sc, inc) (6 stitches).
- Round 3: (1 sc, inc) (9 stitches).
- Rounds 4-5: Crochet 9 sc for 2 rounds.
- Round 6: (1 sc, dec) (6 stitches).
Finishing the Giraffe
- Assembling: Attach the head, body, arms, ears, horns, and snout using the long yarn tails or sewing thread.
- Optional Embellishments: You can add spots to the giraffe using embroidery or fabric paint. Embroider the nose, cheeks, and eyebrows with fine thread to give it a cute look.
Conclusion
Your little crocheted giraffe is now complete! You can customize it further by choosing different yarn colors for a unique look. Enjoy your handmade creation! Don’t forget to tag the author Milamіrgorod if you share your work on social media.